USB Auth
Contents
Demonstration Materials
- Here's the YouTube video of the project: http://www.youtube.com/watch?v=JKTXRlaXLDQ
- Printout for mobile devices
Concept
A computer will monitor for new USB devices being plugged into the system. If the device is on the approved list, it will instruct an external system to unlock a door.
Implementation
Authentication Flow
- User inserts key into USB hub hooked to a PC
- Computer reads serial ID of key
- Computer compares serial ID to list of valid serial ID in a table \ DB \ Flat File
- If good, computer writes data ("Unlock!") to USB line of Microcontroller
- Microcontroller instructs servo to go to unlocked position for 5-10 seconds.
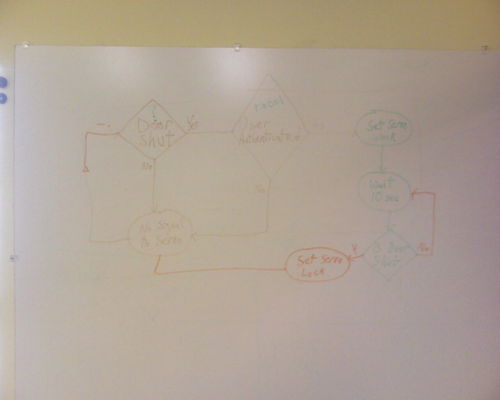
The flowchart for the circuit is below.
Parts List
- Servo $12
- Tubberware $6
- Freeduino (Diecimila) Development Board $36
- Breadboard $5(?)
- Solder, Soldering Iron (On Hand)
- 15k Ohm Resistors (On Hand)
- Button (On Hand)
- Powered USB Hub ? (Necessary: for powering Freeduino with only USB and a laptop)
- Unpowered UBS Hub (Optional: Hub to put outside of door to plug USB keychains into)
Electrical Interface
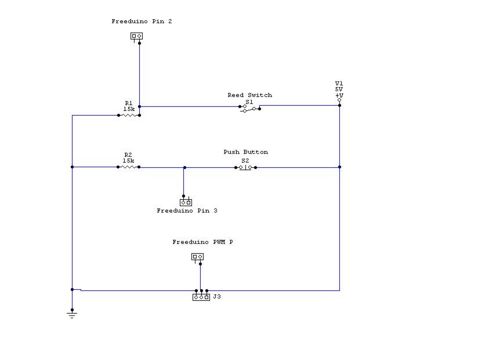
Electrical Interface by Omegix
Note: "Freeduino PWM Pin P" Should be "Freeduino PWM Pin 9"
Note: The pull down resistor on Pin 3 was removed. The internal pullup resistor of
the atmega chip is used now instead, and the interrupt is tripped on a LOW instead of a HIGH.
The resistors here are just pull down resistors.
The reed switch is one of those window sensors commonly found in home security systems.
The push button is for the inside of the door so people can unlock the door to get out.
Pin 9 is the for the Servo signal.
Mechanical Interface
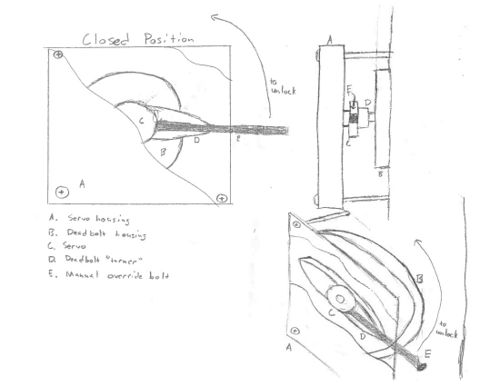
Mechanical Interface design by Gregabyte
Project Enclosure
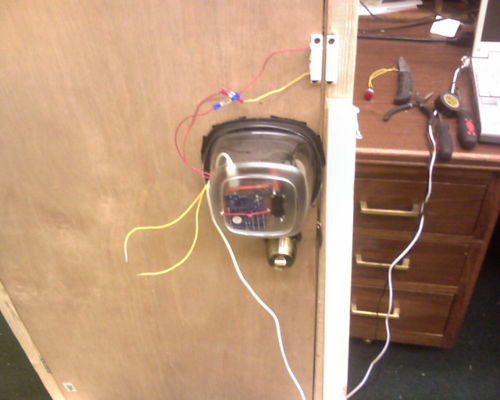
We wanted a project enclosure that we could easily take on and off the door. Also we wanted something that was firm and see-through so people could see the project in action. Tupperware! Thank you, Rubbermaid.
Mechanical Override
Note: Mechanical override will not be implemented till after Phreaknic Omegix 14:58, 21 October 2008 (CDT)
The idea here is to have a servo attached to a standard deadbolt. The microcontroller will need to not only receive a signal from the computer, but also sense a window-open detector, and control a servo.
If you were to attach the stick to the deadbolt turner or the plastic connected to the servo motor shaft, that would allow for a manual unlocker for the door in the event of a power failure
This image from Gregabyte shows a mechanical override system that could be implemented for under $20
Code
USB Reader Code
Coded by Brimstone
#!/bin/sh

# variables!
mymu=A6005ycb
mydev=/dev/ttyUSB0
mydb=usb-keys.txt

# first, define some common functions
function lsserial {
	lsusb -v | awk '/iSerial/ {if ($2 == "3" || $2 == "2") {print $3}}'
}

# figure out whats attached
# check for our microcontroller
if [ $(lsserial | grep -c $mymu) = 0 ] ; then
	echo -n "I don't see the microcontroller "
	if [ -e $mydev ]; then
		echo "but we have a $mydev ?"
	else
		echo
	fi
	exit 1
else
	if [ ! -e $mydev ]; then
		echo "I see the microcontroller, but no $mydev"
		exit 1
	fi
fi

if [ -e $mydb ] ; then
	echo "Found serials for the following people:"
	awk -F, '{print $1}' $mydb
else
	echo "Didn't find keyfile $mydb"
	exit 1
fi

# all good, lets go
preserial=$(lsserial | grep -v $mymu)
if [ -n "$preserial" ]; then
	echo "I've detected the following serial devices already:"
	echo $preserial
fi

echo "Ready and waiting"

# main loop that watches /var/log/messages
(
	tail -n 0 -f /var/log/messages | awk '/new.*USB device/ {print "Attached"; fflush()} /USB disconnect/ {print "Dettached"; fflush()}'
) | (
# main loop that reads that cleaned /var/log/messages
	while read cmd; do
		if [ $cmd == "Attached" ] ; then
			for ser in $(lsserial | grep -v $mymu); do
				echo "Checking for $ser in flat file"
				if [ $(grep -c $ser $mydb) = 1 ]; then
					name=$(awk -F, "/$ser/ {print \$1}" $mydb)
					echo "Unlocking for $name!"
					echo -n U > $mydev
					error=$?
					if [ $error != 0 ]; then
						echo "There was an error ($error) writing to $mydev"
					fi
				else
					echo "Didn't find it in flat file"
				fi
			done
		else
			echo "Got $cmd but nothing implemented for it"
		fi
	done
)
Freeduino Code
Coded by Omegix
//////////////////////////
/// Deadbolt Unlocker Application
/// This code is for a Freeduino deicimila.
/// Code will wait until it sees a "U" character on the serial input
/// And then set a PWM signal to a pre-determined associated physical position corresponding
/// To the unlocked position of a deadbolt.
///
/// Author:  Jeff Cotten
/// Changes:
/// - 12/6/08:  Changed the Override button to activate on LOW rathan than HIGH (this also caused a hardware change)
/// - 12/7/08:  Turned on the pull up internal 20K Ohm pull-up resistor on the atmel chip
/////////////////////////


#include <Servo.h>

#define interrupt1PinA 3 //This is the Pin that the manual override button should be connected to

volatile unsigned int interrupt1Value = 0;

char incomingChar = 0;
Servo myServo;
int pos;
int DoorSensePin = 2;  //this is the PIN that the reed switch is connected to
int lockedPosition = 115;  //This is the value that the servo wants to be at the correct physical position
int unlockedPosition = 28;  //This is the value that the servo wants to be at the correct physical position

boolean HasForceUnlockHappened = 0;  //this is used by the interrupt routine as a workaround to using timers

void setup()
{
  Serial.begin(9600);
  Serial.flush();

  myServo.attach(9);  // attaches the servo on pin 9 to the servo object
  Lock();  //default to locked position at powerup
  //myServo.write(28); //default to locked at powerup

  pinMode(DoorSensePin, INPUT);  //designate pin2 as a sensing (input) pin
  pinMode(interrupt1PinA, INPUT);
  digitalWrite(interrupt1PinA, HIGH);  //this turns on the internal 20k ohm pullup resistor

  //Interrupt pin used is Pin #3
  attachInterrupt(1, ForceUnlock, LOW);  //when interrupt happens, run ForceUnlock function
}

void ForceUnlock() //it is important that no timer related functions happen during an interrupt routine
{
    Serial.println("Force Unlock Button Pressed! Interrupt Called!");
    myServo.write(unlockedPosition);  //cannot call regular Unlock function as it has a delay() call
    HasForceUnlockHappened = 1;
}


void loop()
{
  //Serial.println("In Main Loop");  //TROUBLESHOOTING LINE
  if (HasForceUnlockHappened == 1) //if an interrupt driven ForceUnlock has happened, then need to WaitToLock
  {
    HasForceUnlockHappened = 0;  //reset till next interrupt
    WaitToLock();
  }
  if (Serial.available() > 0)
  {
     incomingChar = Serial.read();

     Serial.print("I recieved: ");
     Serial.println(incomingChar, DEC);
     //Serial.print("The DoorSense Value is: ");
     //Serial.println(IsDoorOpen(), DEC);

    // Code for Unlocking Door.  Unlock does not care if door is closed or not.
    if (incomingChar == 85) //"U" is 85 in DEC.  U is for Unlock
    {
           Serial.println("Unlocking!");
           Unlock();
    }

    //Code for Locking Door.  Lock cares if door is open or closed.
    if (incomingChar == 76)  //"L" is 76 in DEC.  L is for Lock
    {
         if (IsDoorOpen() == 0)
         {
           Serial.println("Locking!");
           Lock();
         }
         if (IsDoorOpen() == 1) { Serial.println("Door is Open!!"); }
    }

  }// if serial end
}//loop end

//IsDoorOpen should return a 1 if Door is Open, and a 0 if Door is Closed.
boolean IsDoorOpen()
{
  if (digitalRead(DoorSensePin) == 1) { return 1; }
  if (digitalRead(DoorSensePin) == 0) { return 0; }
}


  void Unlock()
  {
    myServo.write(unlockedPosition);
    delay(100);
    WaitToLock();
  }

  void Lock()
  {
    myServo.write(lockedPosition);
  }

//This function will loop until the door is closed for 5 seconds and then Lock.
void WaitToLock()
{
BeginWaitingToLock:
   while (IsDoorOpen() == 1)  { /* Serial.println("Door Needs to Close.");    /* do nothing */ }
   //At this point Door should have shut
   Serial.println("Door has been shut! Waiting 5 seconds.");
   delay(1000 * 5); //wait 5 seconds
   if (IsDoorOpen() == 0) // if door is still closed after delay, then lock
   {
      Lock();
   }
   if (IsDoorOpen() == 1)
   {
     Serial.println("Door Did not remain shut.  Starting over loop.");
     goto BeginWaitingToLock;
   }


}
Freeduino Code Change Log
- 12-6-08: Changed interrupt pin for manually unlocking the door to detect LOW instead of HIGH.
- This also meant using the external button's Normally Closed feature instead of Normally Open
- Reason For this change was that the prototype equipment is not grounded to natural ground. The RF noise and Static Electricity was causing a HIGH signal on the wire which was randomly unlocking issuing the command to unlock the door
- KNOWN ISSUES: The method called by the interrupt to unlock the door does not debounce the signal.
This is due to the interrupt disabling the timer function on the Freeduino. There should be a way to work around this, but it will likely not be resolved in Version 1.
C Code Implementation
As of 4/29/13, the latest version is written in C, not Arduino language.
External Links
- Adam Argo developed an iPhone door unlocker
- Good advantages include
- A Switch to leave the door unlocked for a period of time
- Not using an Interrupt, keeping the scan of the pins in the main loop
- Much cleaner appearance
- Good advantages include
In the Media
- Hackaday - http://hackaday.com/2008/10/22/usb-authenticated-deadbolt-lock/
- YouTube - https://www.youtube.com/watch?v=JKTXRlaXLDQ
- GeekOutHuntsville - https://www.facebook.com/GeekOutHSV (June 2nd, 2014. Facebook Post was unlinkable)


