Difference between revisions of "40 Watt Laser Cutter"
Candleknight (Talk | contribs) m (→Calendar) |
Candleknight (Talk | contribs) (Updated acrylic order list) |
||
| Line 14: | Line 14: | ||
| − | The following is a section to keep track of who's ordering what. | + | The following is a section to keep track of who's ordering what.<br> |
| − | + | ||
| − | + | ||
| − | + | <br>John Kelly ([[User:Candleknight|Candleknight]]) | |
| − | * | + | *All sheets 24" x 48" size unless otherwise noted |
| − | * | + | *Clear Acrylic: |
| − | ** | + | **1/16" x 2 |
| − | ** | + | **1/8" x 3 |
| − | ** | + | **1/4" x 2 |
| − | + | ||
| − | + | ||
| − | + | ||
| − | + | ||
| − | *Daniel Valdez | + | *Other Acrylic, 1/8": |
| + | **Transparent red x 0 | ||
| + | **Transparent blue x 1 | ||
| + | **Transparent green x 0 | ||
| + | **Flourecent green x 1 | ||
| + | **mirrored x 1 | ||
| + | |||
| + | *Polycarbonate: | ||
| + | **1/16" x 2 | ||
| + | **1/8" x 1 | ||
| + | **1/4" x 0 | ||
| + | |||
| + | *And one 18" X 36" piece of 1/2" polycarbonate, for the freeze dryer vacuum chamber doors. | ||
| + | |||
| + | <br>Josh Pritt ([[User:Ramgarden|Ramgarden]]) | ||
| + | *24x48 1/8" Polycarbonate | ||
| + | |||
| + | <br>Brimstone ([[User:Brimstone|Brimstone]]) | ||
| + | *???Some acylic??? | ||
| + | |||
| + | <br>Tyler Crumpton | ||
| + | *(All in 1/8" acrylic) | ||
| + | *24x24 Black | ||
| + | *24x24 White #2447 | ||
| + | *12x24 Transparent Grey | ||
| + | *12x12 Fluorescent Orange | ||
| + | *24x48 Transparent Blue | ||
| + | *24x48 Clear (x2 Sheets) | ||
| + | |||
| + | <br>Daniel Valdez | ||
**???? | **???? | ||
| − | + | <br>Bob ([[User:korc|korc]]) | |
**ET0500047536 : 5" od x 4 3/4" id x 35 7/8" long - Clear Extruded | **ET0500047536 : 5" od x 4 3/4" id x 35 7/8" long - Clear Extruded | ||
***Acrylic Tube : Price: $30.99 | ***Acrylic Tube : Price: $30.99 | ||
Revision as of 14:24, 18 June 2012
|
Creator: |
Contents
[hide]- 1 Calendar
- 2 Specifications
- 3 Overview
- 4 SAFETY
- 5 40W Full Spectrum Deluxe Hobby Laser
- 6 Retina Engrave Power Settings
- 7 Raster Engraving Setting Suggestions
- 8 Vector Cutting Setting Suggestions
- 9 Software Notes
- 10 Proposed Upgrades
- 11 Images
- 12 Full Spectrum Website Resources
- 13 Software Resources
- 14 Software
- 15 More Stuff
- 16 Other More Stuff
Calendar
Acrylic Order
- I (Candleknight (talk)) will be ordering a bunch of acrylic and polycarbonate soon. Anybody who wants in on the action to save some money should contact me.
- I plan on placing the order during the first week of July, since there are a few members who asked me for some time to figure up how much material they'll need for their projects. So I'll need to hear back from you as to exactly what you want to order before then. Probably by July 3rd or 5th-ish. I'll send out another email to warn stragglers to get their orders in when the time grows nigh.
- I'm going to split the shipping as a direct proportion of each person's order cost relative to the whole order. So, for example, if the total order is $1000, and the materials you order are $100 of that, then you would be responsible for $100/$1000 = 1/10th = 10% of the shipping cost.
The following is a section to keep track of who's ordering what.
John Kelly (Candleknight)
- All sheets 24" x 48" size unless otherwise noted
- Clear Acrylic:
- 1/16" x 2
- 1/8" x 3
- 1/4" x 2
- Other Acrylic, 1/8":
- Transparent red x 0
- Transparent blue x 1
- Transparent green x 0
- Flourecent green x 1
- mirrored x 1
- Polycarbonate:
- 1/16" x 2
- 1/8" x 1
- 1/4" x 0
- And one 18" X 36" piece of 1/2" polycarbonate, for the freeze dryer vacuum chamber doors.
Josh Pritt (Ramgarden)
- 24x48 1/8" Polycarbonate
Brimstone (Brimstone)
- ???Some acylic???
Tyler Crumpton
- (All in 1/8" acrylic)
- 24x24 Black
- 24x24 White #2447
- 12x24 Transparent Grey
- 12x12 Fluorescent Orange
- 24x48 Transparent Blue
- 24x48 Clear (x2 Sheets)
Daniel Valdez
- ????
Bob (korc)
- ET0500047536 : 5" od x 4 3/4" id x 35 7/8" long - Clear Extruded
- Acrylic Tube : Price: $30.99
- ET0500047536 : 5" od x 4 3/4" id x 35 7/8" long - Clear Extruded
Past
- January 31 2012, 7:00pm - 9:00pm: Laser Cutter Class - Learn to use our Laser Cutter!
Specifications
Outside Dimensions (LxWxH): 31.5"x20"x12"
Net Weight: 70lbs
Maximum material size: 13"x16"
Maximum engrave-able area:9.5"x14.5"
Standard Lens: ZnSe 2" FL
Maximum material thickness: 2.75" (with Z table removed and 2" FL lens, 3.25" with optional 1.5" FL lens)
CO2 Laser Wavelength: 10.6um
Maximum Laser Power: 40W
Maximum Power Requirements: 660W (main laser unit only; excludes water pump/fan/computer/ accessories)
Overview
This is How to Use the laser cutter.
SAFETY
- Treat the Laser Cutter like an angry cobra and you should be just fine.
- As long as the safety mechanisms are working the laser is perfectly safe. If you defeat the magnetic safety interlock switch and run the laser with the case open, then you are exposing yourself to Class 4 Laser Radiation and you deserve what you get. Class 4 means that a coherent reflection can cause "DEVASTATING AND PERMANENT" eye damage with less than 1/100th second exposure, and even diffuse reflections are harmful within a certain distance. Add to that the fact that this is an infrared laser, which means the beam is invisible, and it falls more along the lines of an angry radioactive cobra. DO. NOT. DEFEAT. THE. SAFETY. INTERLOCK.
- Do Not Adjust The Current via the Control Knob. Use the Software Settings.
- DO NOT run the laser at greater than 15mA. Doing so will shorten the life span.
- >20mA will drastically shorten the lifespan.
- Replacement laser tubes are $300 a piece. Don't be a doofus.
- DO NOT run the laser at greater than 15mA. Doing so will shorten the life span.
- The big red E-STOP button is there for a reason. Use it if things go awry.
40W Full Spectrum Deluxe Hobby Laser
HAVE A PATTERN TO CUT (the computer has internet and a couple of programs for editing images)
- Turn on the Laser and dedicated Laser Control Computer via Power Splitter. (classy? yes!)
- Make sure the Laser Control Computer boots into Windows, it really wants to be a linux box.
- Transfer the Pattern to the LCC
- On the Taskbar, click the RetinaEngrave icon (it looks like a blue triangle)
- When it has loaded, check to see that it is connected to the Laser Cutter (bottom left corner should say "Connected")
- Minimize it
- Open the Pattern
- Inkscape is suggested for Vector Mode
- Corel Draw is available, as is GIMP and a number of other programs
- Print the Pattern and make sure the "Full Spectrum Engineering Driver" is the selected printer
- RetinaEngrave should receive the pattern.
- See the table below for RetinaEngrave settings
- Insert the Material to be cut.
- Set the Laser's height based on the ruler. (picture below)
- Manually turn the height adjust wheel to raise or lower the bed.
- Be sure to click the "Perimeter" button in Retina engrave to verify that the Material is properly spaced, move the laser head as needed.
- Set the Laser's height based on the ruler. (picture below)
- Click the "Go" button to begin cutting.
- You can do a test run by leaving the door open. The laser head will move, but the laser will not engage.
WHEN YOU ARE DONE
- There is a 'Shutdown' link on the desktop that turns the computer off
- Flip the power button on the Power Splitter
- Blow the water out of the Laser Tube in the Orange Bucket (to prevent freezing)
Retina Engrave Power Settings
- High Density Fiberboard (HDF) 1/8"
- Vector Mode: POWER: 100% | SPEED: 90% | NUM CUTS: 30 to 35
Raster Engraving Setting Suggestions
S= Speed
P= Power
R= Resolution
A Note About Power Settings:
blah blah blah, I need to fill this in
Acrylic: 1/4"
S:100
P:5-10mA
R:250
Acrylic: 1/8"
S:100
P:5-10mA
R:250
Tempered Fiberboard: 3/16"
S:100
P:?
R:?
Tempered Fiberboard: 1/8"
S:?
P:?
R:?
Cardstock: 110 lb, white
Marking
S:100
P:0.75-2 turns of the knob
R:250
Vector Cutting Setting Suggestions
S= Speed
P= Power
N= Number of repetitions
A Note About Height Settings:
blah blah blah, I need to fill this in
Acrylic: 1/4"
S:30
P:100
N:2
Acrylic: 1/8"
S:30
P:100
N:1
Tempered Fiberboard: 3/16"
S:30
P:100
N:3
Tempered Fiberboard: 1/8"
S:?
P:?
N:?
Luan Wood
S:?
P:?
N:?
Cardstock: 110 lb, white
Cutting
S:100
P:10
N:1
Fold Lines
S:100
P:0.2-0.5-10.0
N:1
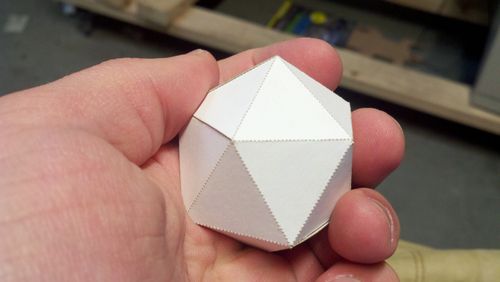
Other Instructions: In Pepakura, set the dotted line settings to be ~ Line= 0.1, Gap= 0.5 or 0.4 for the mountain/valley fold lines. This will produce a nice dotted line down to even very small scales and doesn't burn too much material, so the joint still remains fairly strong.
Reminder: When cutting out Pepakura shapes, make the cut lines and the fold lines different colors so they'll show up as separate layers in RasterEngrave's vector setup screen.
Foamcore
Cutting
S:100
P:40
N:2
- These numbers seem a bit high. Might want to experiment some more... --Candleknight (talk) 14:40, 13 June 2012 (CDT)
Sugar, Table, Granulated
- Don't go over about 15-20% power on vector cutting or it starts to taste like burnt wood 8P
- 10% seems to do a decent job
- Putting the laser about 2mm out of focus also seems to help it not burn as badly.
Polycarbonate
Safety
- I've heard several opinions as to whether or not it is safe to cut polycarbonate on the laser cutter, so I've tried to look into it a bit.
- I have determined that, with the recent upgrade to the ventilation system, polycarbonate should be safe to laser cut here at the makeshop.
- I have also read, but not verified, that freezing the material before cutting may help achieve better results. (ie. cleaner edges, less browning, etc.)
- A few references:
- US Plastic Corporation: Can polycarbonate be laser cut?
- cnczone.com forums
- epiloglaser.com
- ponko.com
- instructables.com Post from "pedalmonkey" about halfway down has some good advice on cutting/polishing
- CR4 forums
Software Notes
RasterEngrave
Inkscape
General
- Snapping is your friend.
Making perforated lines:
(for creating perforated fold lines on cardstock paper)
- Draw the lines
- Select the line you want to be perforated
- Got to "Object->Fill and Stroke"
- Under "Stroke Style" set:
- Width = 0.1mm (remember to set unit to mm in the box next to it)
- Dashes = 5th to 7th dashed line down in the selection box
- go to "Extensions->Modify Path->Convert to Dashes"
- try to do this as close to printing as possible, as moving and editing the lines after you convert to dashes is
a pain in the assinconvenient.
- try to do this as close to printing as possible, as moving and editing the lines after you convert to dashes is
- Suggested laser settings: S:100% P:0.5-10% (0.5% will make perforations most of the way through the page. 10% will go all the way through. Both usually leave enough material between the holes to maintain material strength, but sometimes the higher power one can be easier to fold, though slightly weaker. Tweak depending on how close your dots are, application, and personal preference. My personal preference is 0.5)
Making gears:
- Go to "Extensions->Render->Gear"
- Pick your gear's properties and hit "Apply"
- Notes:
- Pressure Angle controls the shape of the tooth.
- 20 degrees is industry standard for general use gears.
- Circular Pitch controls the distance between teeth. Changing this usually just has the effect of scaling the size of the gear up and down.
- 20 seems to make a modest size gear.
- To make a gear with the teeth on the inside(like for a planetary gear set) just use the same process, but maybe put a circle around the outside.
- Protip: As long as pressure angle and circular pitch are the same for two gears, their teeth will fit together regardless of how many teeth each has.
- Caution: If you scale the gears after their creation, then you are effectively changing their circular pitch, and they won't fit together with any other unscaled gears
- Pressure Angle controls the shape of the tooth.
- Notes:
- To add holes to the center of gears, make a circle(or what ever shape) and use the "Snap to and from centers of objects" button on the far right toolbar to line it up to the center of the gear.
- 8mm circles for holes seem to work rather well as a starting point
HyCad
General
- 1 unit == 1mm in HyCad
- to print accurately sized shapes, go to "File->Print Preview" and make sure that "Scale" = 1
Pepakura
General
- To print perforated joints, go to "Settings->Other Settings" and set the dotted line settings to be ~ Line= 0.1, Gap= 0.5 or 0.4 for the mountain/valley fold lines. This will produce a nice dotted line down to even very small scales and doesn't burn too much material, so the joint still remains fairly strong. Suggested laser settings: S:100 P:0.5
- blahblahblah need to add some stuff about setting up the print settings and color layers blahblahblah --Candleknight (talk)
Proposed Upgrades
Beam Combiner
Function: Combines the aiming laser beam in with the cutting laser beam. This makes the aiming laser take the same path as the cutting laser and pass through the lens aperture. This takes the beam from a slopy 0.25" beam that shoots in from the side to a very tight 0.001" beam that comes from the cutting aperture and illuminates the exact spot the cutting beam will hit.
Use: I think it would be especially useful for precision alignment of work or for jobs that require multiple stages. (ex: print a design off on a normal printer, then line the laser cutter up to precisely cut out the pattern)
Cost: $300
Current Pledges:
- Candleknight: $100-150
- Phil: $50-100
Ventilation Improvement (Completed)
***UPDATE*** Project finished and installed! It works like a charm. You can stick your nose right up to the laser cutter while it's cutting acrylic, and you can't smell a thing.
No more stinky shop! No more lung damage!! Huzzah! HUZZAH!
Function: Improve the ventilation of the laser cutter's exhaust, both in how hard it sucks and where it lets out.
Use:
- Not dying a slow death from deadly laser fumes.
- General not stinky-ness of the electronics room.
- Help keep inside of laser cutter cleaner.
Possible Materials:
"Finalized" Materials List:
- 1x 8" InLine blower Fan @ $120
- 3x 8" ducting @ $25 each = $75
- 1x Blower Speed Controller @ $22
Total cost ≈ $217 = $215.95
Project Financing Signup:
- Phil: $80
- Jeff: $15 ( I WILL forget about this, please ping me )
- Scott Savage: $22
- David Reimer: $???
Research
- Static Pressure Calcuations
- McMaster Carr page on Fume Exhaust Fans
- McMaster Carr page on Fume Exhaust Enclosures. In particular, look at the cfm flow rate for the fume exhaust hood that looks about the same size as the laser cutter (item 20995K61). It takes 200CFM @ 0 Static Pressure
Images
Full Spectrum Website Resources
40W Hobby Laser User Manual
RetinaEngrave User Manual
40W CO2 Deluxe Hobby Laser Product Page
FullSpectrumEngineering Forums
Software Resources
Software
123D (by AutoDesk)
More Stuff
Other More Stuff
Box making extension for Inkscape
Make a giraffe!
Friggin T-Rex!
Make It Real Contest
