Difference between revisions of "ACCTECH 4'x8' CNC"
Enabrintain (Talk | contribs) (→Overview: part 1) |
Enabrintain (Talk | contribs) (→Getting Started: fleshed out article) |
||
| Line 8: | Line 8: | ||
==== Getting Started ==== | ==== Getting Started ==== | ||
| − | + | 1. Start with a DXF file. | |
| − | + | CamBam can open other files, but I have only messed with dxf so far. | |
| − | + | 2. Open in CAM software, produce GCODE. Make sure you are set to metric. | |
| − | + | <gallery> | |
| − | + | File:Cambam1.png|open cambam | |
| − | + | File:Cambam2.png|open file | |
| − | + | File:Cambam3.png|unify the lines (select all, ctr-j) | |
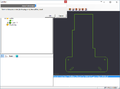
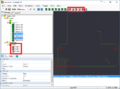
| − | + | File:Cambam4.png|align to origin (select all, right click->transform->align, left,bottom,none) | |
| − | + | File:Cambam5.png|verify scale (select all, right click->transform->resize, look at original size column) | |
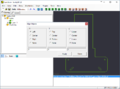
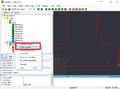
| + | File:Cambam6.png|select profiles, pockets, and drills | ||
| + | File:Cambam6.png|add config settings | ||
| + | File:Cambam7.png|generate gcode | ||
| + | </gallery> | ||
| + | ===== add config settings ===== | ||
| + | * Profile | ||
| + | ** Inside/Outside - pick the side that you want the bit to cut around | ||
| + | ** Clearance Plane = ===== 15 ===== this is how high to raise the bit in mm when travelling | ||
| + | ** Depth Increment = ===== 1/2 the bit diameter ===== this is how deep the bit cuts, I fudge a bit for 1/8" bits and sometimes do 2mm it the wood is soft | ||
| + | ** Target Depth = ===== The thickness of the workpiece + 1mm ===== this is how deep to cut, it can be less, but should not be greater | ||
| + | ** Feedrate = ===== ignore this ===== | ||
| + | ** Holding Tabs = ===== RECOMENDED.===== Set to auto, the generate toolpaths, then click and drag to position tabs as desired. I usually set ti to square, and make it at least 5mm high and 10 mm long | ||
| + | ** Corner Overcut = set this to introduce dog boning | ||
| + | ** Tool = set this to the diameter of the tool | ||
| + | |||
| + | 3. Load GCODE onto a thumb drive, then plug it into the CNC's Controller. | ||
| + | |||
| + | 4. Turn on the CNC, Navigate to the File menu. | ||
| + | <gallery> | ||
| + | File:20160420_173028.jpg|Turn on the cnc | ||
| + | File:20160420_173028.jpg|Remove the old job, leaving the two default jobs alone. | ||
| + | File:20160420_173028.jpg|Copy the new job from the thumb drive to the Controller. | ||
| + | File:20160420_173028.jpg|Ensure that the bit is correct for the GCODE you CAMmed. | ||
| + | File:20160420_173028.jpg|Set your origin. | ||
| + | File:20160420_173028.jpg|Start the job! | ||
| + | </gallery> | ||
| + | |||
| + | * Remove the old job, leaving the two default jobs alone. | ||
| + | * Copy the new job from the thumb drive to the Controller. | ||
| + | * Ensure that the bit is correct for the GCODE you CAMmed. | ||
| + | * Set your origin. | ||
| + | * Start the job! | ||
==== What to do if something goes Wrong ==== | ==== What to do if something goes Wrong ==== | ||
Revision as of 17:52, 20 April 2016
|
Creator: |
Contents
[hide]Overview
Getting Started
1. Start with a DXF file.
CamBam can open other files, but I have only messed with dxf so far.
2. Open in CAM software, produce GCODE. Make sure you are set to metric.
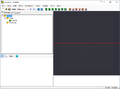
open cambam
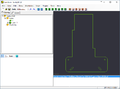
open file
unify the lines (select all, ctr-j)
align to origin (select all, right click->transform->align, left,bottom,none)
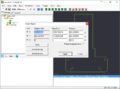
verify scale (select all, right click->transform->resize, look at original size column)
select profiles, pockets, and drills
add config settings
generate gcode


add config settings
- Profile
- Inside/Outside - pick the side that you want the bit to cut around
- Clearance Plane = ===== 15 ===== this is how high to raise the bit in mm when travelling
- Depth Increment = ===== 1/2 the bit diameter ===== this is how deep the bit cuts, I fudge a bit for 1/8" bits and sometimes do 2mm it the wood is soft
- Target Depth = ===== The thickness of the workpiece + 1mm ===== this is how deep to cut, it can be less, but should not be greater
- Feedrate = ===== ignore this =====
- Holding Tabs = ===== RECOMENDED.===== Set to auto, the generate toolpaths, then click and drag to position tabs as desired. I usually set ti to square, and make it at least 5mm high and 10 mm long
- Corner Overcut = set this to introduce dog boning
- Tool = set this to the diameter of the tool
3. Load GCODE onto a thumb drive, then plug it into the CNC's Controller.
4. Turn on the CNC, Navigate to the File menu.
- 20160420 173028.jpg
Turn on the cnc
- 20160420 173028.jpg
Remove the old job, leaving the two default jobs alone.
- 20160420 173028.jpg
Copy the new job from the thumb drive to the Controller.
- 20160420 173028.jpg
Ensure that the bit is correct for the GCODE you CAMmed.
- 20160420 173028.jpg
Set your origin.
- 20160420 173028.jpg
Start the job!
- Remove the old job, leaving the two default jobs alone.
- Copy the new job from the thumb drive to the Controller.
- Ensure that the bit is correct for the GCODE you CAMmed.
- Set your origin.
- Start the job!
What to do if something goes Wrong
- Pause the Job
- Stop the Job
- Restarting a saved job