Photobooth Mark II v1
From Makers Local 256
Contents
Overview
Like the Mark I only smaller and better.
Status
Planning
Goals
- Linux based for more flexibility.
- All open source if possible.
- Improvements over the Mark I
- Smaller profile when packed while retaining the same overall height when setup
- Significantly lighter
- Better project documentation.
- Chronological record.
Notes
Preliminary Notes
- Improved stability by the addition of a floor attached to the seat. Floor options:
- Accordions up under the seat.
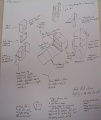
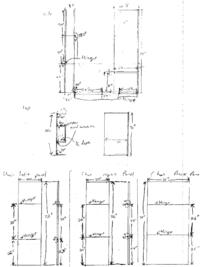
- Folds up covering the opening under the seat and goes over the top. See bottom left of the drawing.
- End opposite the seat has pegs or something to set the camera down onto.
- Attempting to make all parts(curtains and rods) go into the final package.
- It was mentioned to me at Outerz0ne4 that the photobooth needs an audio countdown in addition to the text countdown. --Nykodemus 22:31, 23 March 2008 (CDT)
Later Notes
- Everything is one series of connected pieces out of the box except the privacy wall around the seat and the curtains.
- Roll out floor with camera tower attached to the end.
- Upward telescoping camera tower that locks in place.
- Computer platform change.
- Ramline 510s proved to be unreliable and prone to overheating.
- Linux still the preferred operating system.
Progress
- 04/30/2007: Initial design discussion began with Korc.
- 05/04/2007: At the 2600 meeting Korc brought his design notes in the form of some drawings. "Project board" was suggested as being strong enough and light enough(lighter than plywood from the Mark I design) to suit our purposes.
- 05/05/2007: Linux has been decided as the OS for the Mark II with mencoder to handle live video and "picture" taking, thanks Brimstone for offering that suggestion. Linux would allow us to have remote access as well providing security and remote trouble shooting capability.
- 05/11/2007: Met Korc at his office in the Optics Building at UAH to go over the final design for the Mark II. We managed to make several improvements of the design over the course of ~3 hours, most notably being it's more origami-like, and finalize all the measurements. Korc took a video of me drawing the final structural design with his new Flip video camera. We have yet to find the material we need in town in order to begin construction, but did manage to figure out the curtain rods and their secondary use as handles. Sketchup drawings will be made within a couple of days of each individual element. Video and pictures to follow shortly.
- 06/14/2007: Korc and Strages bought 75% of the raw material needed to start building the Mark II. This is roughly enough to complete the seat, floor, and curtain rod portions. Construction will begin tomorrow around lunch time at Korc's place.
- 06/16/2007: Korc and Strages started the build process today. No major set backs. Work will resume again on Tuesday.
- 07/12/2007: Met at Korc's to work some more. Didn't really get anything accomplished physically, but did manage to make some small but highly effective design improvements as well as noticing a slight mistake we made when building the seat. It's about 2.5" shorter in width than we wanted due to a mistake we made when making the bottom of the seat box, but it's nothing we can't work around.
- 08/04/2007: Managed to get the tablet, running Linux, to operate as a photobooth. With live video!
- 08/11/2007: Met at Korc's to work some more. Managed to get the pieces for the fold up back part of the seat partition measured and cut. Will probably be buying the remaining materials this coming weekend.
- 10/30/2008: Made this page in hopes of documenting this better, note the large gap between this and the last date.
Materials
- Main sheet material
- "Ponderosa Pine Panels" spotted at Lowe's. Not cheap, but lighter than corresponding width plywood, strong, and will hold screws well.
- Curtain Rods/Stabilizing poles
- (4) 3-foot sections of steel pipe
- (2) Joining adapters (freely spinning to handle right-handed threads on each side.
- (6) Threaded flanges. 4 to mount to the front and back walls to stabilize the booth, 2 to mount to a small 1x4 to be slid into place on the side of the packed up booth box and used as levers to help move it (like a wheelbarrow).
- Mobility
- 2 short 1x4 pieces
- 4 short steel U-Channel pieces, wide enough for 1x4 to slide into
- Casters for mounting to 1x4, to slide into place in angle iron brackets


