Difference between revisions of "TARDIS Backpack"
m |
m (Added more info) |
||
| (13 intermediate revisions by one user not shown) | |||
| Line 6: | Line 6: | ||
==Overview== | ==Overview== | ||
| − | |||
| − | |||
| − | |||
| − | |||
There is a very popular Sci-Fi TV show called [http://en.wikipedia.org/wiki/Doctor_Who Doctor Who]. The main character of the TV show is "The Doctor". The Doctor travels all of time and space in the TARDIS or the '''T'''ime '''A'''nd '''R'''elative '''D'''iminsion '''I'''n '''S'''pace. | There is a very popular Sci-Fi TV show called [http://en.wikipedia.org/wiki/Doctor_Who Doctor Who]. The main character of the TV show is "The Doctor". The Doctor travels all of time and space in the TARDIS or the '''T'''ime '''A'''nd '''R'''elative '''D'''iminsion '''I'''n '''S'''pace. | ||
| − | There is also a very popular Sci-Fi convention in Atlanta, GA called [http://www.dragoncon.org/ Dragon*Con] that I like to attend every year. For Dragon*Con | + | There is also a very popular Sci-Fi convention in Atlanta, GA called [http://www.dragoncon.org/ Dragon*Con] that I like to attend every year. For Dragon*Con 2012, I decided that I wanted to carry my everyday items around in a TARDIS. So this is the process I went through to create my TARDIS backpack. |
==TARDIS Backpack== | ==TARDIS Backpack== | ||
| Line 19: | Line 15: | ||
I decided that sewing a backpack together would be to hard. So I decided to make one out of plexiglass. | I decided that sewing a backpack together would be to hard. So I decided to make one out of plexiglass. | ||
| − | The first thing I did was decide how big I wanted to backpack to be. I created 5 squares | + | The first thing I did was decide how big I wanted to backpack to be. I created 5 squares: 1 for the bottom, 2 for the sides, and 2 for the front and back in [http://inkscape.org/ Inkscape]. I then cut the plexiglass with our [https://256.makerslocal.org/wiki/40_Watt_Laser_Cutter 40 Watt Laser Cutter]. I taped the 5 pieces together to form the main part of the TARDIS. |
[[File:Box_Taped_Together.jpeg|thumb|none|300px|Box Taped Together]] | [[File:Box_Taped_Together.jpeg|thumb|none|300px|Box Taped Together]] | ||
| + | Once the box was taped together I used acrylic glue to glue it together. The box dried for 24 hours and then the tape was removed. | ||
| − | + | I then created another box and glued that piece to a smaller piece of plexiglass for the top of the TARDIS. This piece is what allows me to get in and out of the box. This piece also dried for 24 hours and then the tape was removed. | |
| − | + | ||
[[File:Top_Taped_Together.jpeg|thumb|none|300px|Top with Box for Light Taped Together]] | [[File:Top_Taped_Together.jpeg|thumb|none|300px|Top with Box for Light Taped Together]] | ||
| + | I then attached the hinges and latch for the top of the box. | ||
| + | [[File:Top_With_Parts.jpeg|thumb|none|300px|Top with Parts Attached]] | ||
| + | I was ready to make the TARDIS blue at this point. So I placed blue duct tape around the box. | ||
| − | [[File: | + | To get the "Police Public Call Box" lettering, I placed black duct tape on a piece of plexiglass. I then used the Laser Cutter to cut out "Police Public Call Box". |
| + | |||
| + | [[File:Police_Public_Call_Box.jpeg|thumb|none|300px|Police Public Call Box]] | ||
| + | |||
| + | [http://www.youtube.com/watch?v=K1fMjLnHmkU&feature=youtu.be Here] is the link to the Laser Cutter cutting out the "Police Public Call Box" piece. | ||
| + | |||
| + | This is what the final piece looks like: | ||
| + | |||
| + | [[File:Police_Public_Call_Box_Piece.jpeg|thumb|none|500px|Police Public Call Box Piece]] | ||
| + | |||
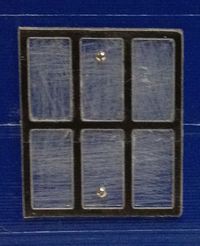
| + | The next step was to create the windows. I created a window template in Inkscape. I placed black duct tape on a piece of plexiglass just like I did for the "Police Public Call Box" piece. I had the Laser Cutter cut the middle pieces out. The windows looked too clean when there were finished in the Laser Cutter. The didn't look like they had traveled all of time and space. So I took a piece of sand paper and scraped up the back of the windows. This is what the final piece looks like: | ||
| + | |||
| + | [[File:Windows_Piece.jpeg|thumb|none|200px|Window Piece]] | ||
| + | |||
| + | I placed 2 windows and the "Police Public Call Box" piece on the 2 sides and the front. I then screwed them into the box. | ||
| + | |||
| + | The next step was figuring out how to wear it. I sewed backpack straps to hardware loop plates. Then I attached the loop plates to the box. | ||
| + | |||
| + | [[File:Loop_Plates_Attached.jpeg|thumb|none|200px|Loop Plates Attached]] | ||
| + | |||
| + | I did this to both sides of the box. | ||
| + | |||
| + | |||
| + | Now the backpack was finished and it was ready for Dragon*Con!!! | ||
| + | |||
| + | [[File:TARDIS_Backpack.jpeg|thumb|none|300px|TARDIS Backpack]] | ||
| + | |||
| + | ==Dragon*Con!== | ||
| + | |||
| + | My backpack received a lot of praise at Dragon*Con!! I had a couple people tell me that I should have John Barrowman, who plays Captin Jack Harkness in Doctor Who and Torchwood, to sign the backpack since he was a guest at Dragon*Con. | ||
| + | |||
| + | |||
| + | So...I got him to sign it! :) | ||
| + | {| | ||
| + | |[[File:Captin_Jack.jpeg|thumb|none|300px|Captin Jack Signature]] | ||
| + | | | ||
| + | | | ||
| + | | | ||
| + | | | ||
| + | |[[File:Captin_Jack_TARDIS_Backpack.jpeg|thumb|none|200px|TARDIS wth Captin Jack Signature]] | ||
| + | |} | ||
| + | |||
| + | Overall, this was a VERY fun build!! I hope this wiki page helps you create a TARDIS backpack of your very own!! | ||
Latest revision as of 20:48, 24 May 2013
|
Creator: |
Overview
There is a very popular Sci-Fi TV show called Doctor Who. The main character of the TV show is "The Doctor". The Doctor travels all of time and space in the TARDIS or the Time And Relative Diminsion In Space.
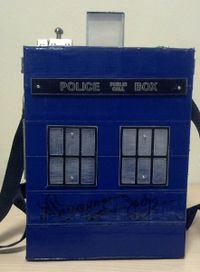
There is also a very popular Sci-Fi convention in Atlanta, GA called Dragon*Con that I like to attend every year. For Dragon*Con 2012, I decided that I wanted to carry my everyday items around in a TARDIS. So this is the process I went through to create my TARDIS backpack.
TARDIS Backpack
I decided that sewing a backpack together would be to hard. So I decided to make one out of plexiglass.
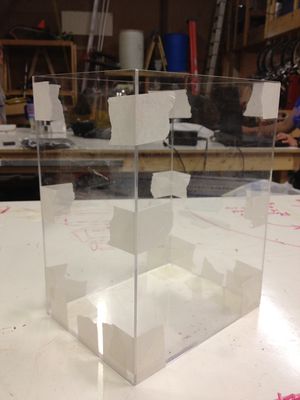
The first thing I did was decide how big I wanted to backpack to be. I created 5 squares: 1 for the bottom, 2 for the sides, and 2 for the front and back in Inkscape. I then cut the plexiglass with our 40 Watt Laser Cutter. I taped the 5 pieces together to form the main part of the TARDIS.
Once the box was taped together I used acrylic glue to glue it together. The box dried for 24 hours and then the tape was removed.
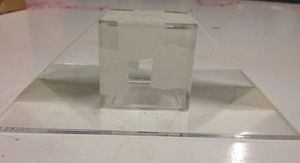
I then created another box and glued that piece to a smaller piece of plexiglass for the top of the TARDIS. This piece is what allows me to get in and out of the box. This piece also dried for 24 hours and then the tape was removed.
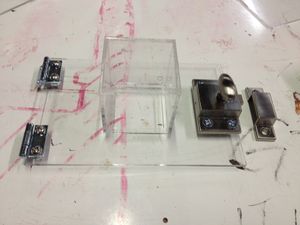
I then attached the hinges and latch for the top of the box.
I was ready to make the TARDIS blue at this point. So I placed blue duct tape around the box.
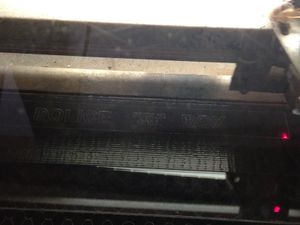
To get the "Police Public Call Box" lettering, I placed black duct tape on a piece of plexiglass. I then used the Laser Cutter to cut out "Police Public Call Box".
Here is the link to the Laser Cutter cutting out the "Police Public Call Box" piece.
This is what the final piece looks like:
The next step was to create the windows. I created a window template in Inkscape. I placed black duct tape on a piece of plexiglass just like I did for the "Police Public Call Box" piece. I had the Laser Cutter cut the middle pieces out. The windows looked too clean when there were finished in the Laser Cutter. The didn't look like they had traveled all of time and space. So I took a piece of sand paper and scraped up the back of the windows. This is what the final piece looks like:
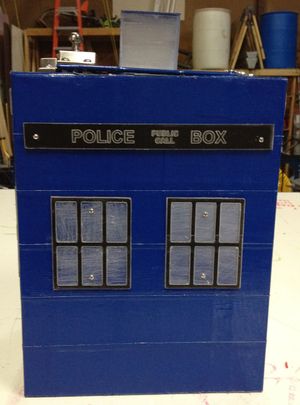
I placed 2 windows and the "Police Public Call Box" piece on the 2 sides and the front. I then screwed them into the box.
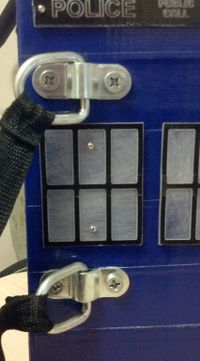
The next step was figuring out how to wear it. I sewed backpack straps to hardware loop plates. Then I attached the loop plates to the box.
I did this to both sides of the box.
Now the backpack was finished and it was ready for Dragon*Con!!!
Dragon*Con!
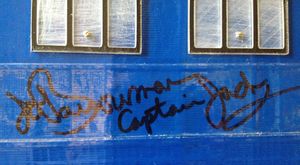
My backpack received a lot of praise at Dragon*Con!! I had a couple people tell me that I should have John Barrowman, who plays Captin Jack Harkness in Doctor Who and Torchwood, to sign the backpack since he was a guest at Dragon*Con.
So...I got him to sign it! :)
Overall, this was a VERY fun build!! I hope this wiki page helps you create a TARDIS backpack of your very own!!
