Difference between revisions of "Cerealbot/avr"
(Created page with section from cerealbot/rpi) |
m (→Building - Uploading: notes) |
||
| (5 intermediate revisions by one user not shown) | |||
| Line 1: | Line 1: | ||
| − | == | + | == AVR? == |
To make the Cerealbot code work, you have to have some sort of AVR microcontroller. This can range anywhere from a full-fledge Arduino, to a somewhat cheaper Diavolino, to a bare breadboarded ATmega328. | To make the Cerealbot code work, you have to have some sort of AVR microcontroller. This can range anywhere from a full-fledge Arduino, to a somewhat cheaper Diavolino, to a bare breadboarded ATmega328. | ||
| Line 5: | Line 5: | ||
I'm using a Diavolino wired to the RPi via GPIO headers. Again, there are good resources out there, no need to copy me exactly. | I'm using a Diavolino wired to the RPi via GPIO headers. Again, there are good resources out there, no need to copy me exactly. | ||
| − | == Wiring to RPi | + | == Wiring to RPi Headers == |
| − | + | [[File:Atmega168PinMap2.png|frameless|right|ATmega Pins]] | |
| − | + | [[File:pi-gpio-b-plus.png|thumbnail|right|Raspberry Pi 2 Headers]] | |
| − | I'm using a high-low logic level converter to protect the Pi. This is crucial; the arduino is capable of burning out the headers on the Pi without some sort of voltage divider. | + | There are two ways I'm interested in using to program the ATmega: UART and ISP. UART uses the RX/TX pins on the controller, is a little safer, and requires the Arduino bootloader. ISP Uses MISO/MOSI and writes the chip directly, no bootloader required. Either method is straightforward with a tool such as an ISP programmer or FTDI adapter, this page is for detailing methods to cut those out and instead use the RPi headers. |
| + | |||
| + | === UART - bootloader === | ||
| + | |||
| + | On the Pi's headers, there's a default serial Rx/Tx associated with /dev/ttyAMA0 and console boot. We're going to yank it away from the OS and use it to speak with and program the ATmega328. | ||
| + | |||
| + | I'm using a high-low logic level converter to protect the Pi. This is '''crucial'''; the arduino is capable of burning out the headers on the Pi without some sort of voltage divider. You can also just use a resistor, just make sure the arduino cannot push 5V back onto the Pi. | ||
The following table uses the HARDWARE (aka "Board") GPIO mappings! You can reference [http://www.raspberrypi-spy.co.uk/2014/07/raspberry-pi-b-gpio-header-details-and-pinout/ this image], and use the numbers in the circles, not by the labels! | The following table uses the HARDWARE (aka "Board") GPIO mappings! You can reference [http://www.raspberrypi-spy.co.uk/2014/07/raspberry-pi-b-gpio-header-details-and-pinout/ this image], and use the numbers in the circles, not by the labels! | ||
{| class="wikitable" | {| class="wikitable" | ||
|- | |- | ||
| − | ! Arduino Pin || RPi GPIO | + | ! Arduino Pin || ATmega328 Pin || RPi GPIO |
|- | |- | ||
| − | | Rx (0) || UART0_TXD (8) | + | | Rx (0) || PD0 (2) || UART0_TXD (8) |
|- | |- | ||
| − | | Tx (1) || UART0_RXD (10) | + | | Tx (1) || PD1 (3) || UART0_RXD (10) |
|- | |- | ||
| − | | GND || GND (6) | + | | GND || GND (8,22) || GND (6) |
|- | |- | ||
| − | | | + | | RTS (RST) || PC6 (1) || GPIO (11) |
|} | |} | ||
| − | Connect Vcc and GND pins from the Arduino to an external source, I don't suggest wiring them to the | + | Connect Vcc and GND pins from the Arduino to an external source, I don't suggest wiring them to the header. |
| − | ==== | + | ==== Configure UART0 ==== |
We need to [http://spellfoundry.com/sleepy-pi/setting-arduino-ide-raspbian/ kick Rasbian] off of the header GPIO: | We need to [http://spellfoundry.com/sleepy-pi/setting-arduino-ide-raspbian/ kick Rasbian] off of the header GPIO: | ||
| Line 51: | Line 57: | ||
=== ISP - no bootloader === | === ISP - no bootloader === | ||
| + | |||
| + | This works... I know it... But I need to go back and verify at some point. Email me if you need this. | ||
| + | |||
| + | [https://learn.adafruit.com/program-an-avr-or-arduino-using-raspberry-pi-gpio-pins/installation Guide] | ||
== Toolchain == | == Toolchain == | ||
| − | ==== | + | I recommend using PlatformIO over a makefile. |
| + | |||
| + | === PlatformIO === | ||
| + | |||
| + | An alternative that I'm testing to makefiles is [http://platformio.org/#!/ PlatformIO]. Suffice to say its a pretty promising system to help extend the Arduino sketch to as many MCUs as possibly with minimal effort. Installation on my desktop was straightforward, but there's a gotcha or two to setting it up on the RPi. | ||
| + | |||
| + | ArchlinuxArm requires: | ||
| + | * ncurses5-compat-libs | ||
| + | * libftdi-compat | ||
| + | * libtinfo (6-7 also provides libtinfo.so.5 file) | ||
| + | |||
| + | ==== Install - Raspbian - RPi 2 ==== | ||
| + | |||
| + | Check that python2.7 and pip are installed. | ||
| + | |||
| + | Make sure pip, setuptools, and virtualenv are updated. | ||
| + | <pre> | ||
| + | sudo pip install --update pip | ||
| + | sudo pip install --update setuptools | ||
| + | sudo pip install --update virtualenv | ||
| + | </pre> | ||
| + | |||
| + | Create and activate our pio_env space for platformio: | ||
| + | <pre> | ||
| + | # Create virtual environment: | ||
| + | virtualenv ~/pio_venv | ||
| + | # Effectively set the venv as python's locus: | ||
| + | source ~/pio_venv/bin/activate | ||
| + | # When you're done with the venv, close with: | ||
| + | #deactivate | ||
| + | </pre> | ||
| + | |||
| + | Run deactivate only when you're done working with platformio. Next we need to install platformio and scons: | ||
| + | <pre> | ||
| + | pip install --egg SCons | ||
| + | pip install platformio | ||
| + | </pre> | ||
| + | |||
| + | If you receive an error about '--egg' then re-do the ''pip install --update'' commands above to make sure the tools in the venv are up-to-date. Now we need to get the right build tools through platformio: | ||
| + | <pre> | ||
| + | platformio platforms install atmelavr | ||
| + | </pre> | ||
| + | |||
| + | If you're using a USB programmer, that should be it! Otherwise, see the section below to set things up for programming over the ATmega's Rx/Tx lines. | ||
| + | |||
| + | ==== Configure for UART GPIO ==== | ||
| + | |||
| + | If you've got a bootloader on the ATmega, wire it as discussed above, and then set things up for PlatformIO to be able to program the chip. To do this you must have transparent 'sudo' installed, which drops you into root without asking for a password. This is the default behaviour for Raspbian. I'd like to find some other way to do this privilege escalation. | ||
| + | |||
| + | Go get a version of [https://github.com/ctag/avrdude-rpi avrdude-rpi]: | ||
| + | <pre> | ||
| + | cd ~ | ||
| + | git clone https://github.com/ctag/avrdude-rpi.git | ||
| + | </pre> | ||
| + | This was initially created by [http://www.deanmao.com/2012/08/12/fixing-the-dtr-pin/ deanmao]. I've only tweaked some things to my liking. | ||
| + | |||
| + | Then, use these new files to transparently add DTR bumping to avrdude: | ||
| + | <pre> | ||
| + | cd ~/.platformio/packages/tool-avrdude | ||
| + | mv avrdude avrdude-original | ||
| + | cd ~/avrdude-rpi | ||
| + | cp avrdude-autoreset ~/.platformio/packages/tool-avrdude/avrdude | ||
| + | cp autoreset ~/.platformio/packages/tool-avrdude/autoreset | ||
| + | </pre> | ||
| + | |||
| + | Now PlatformIO should be able to write a new program to the ATmega via the arduino bootloader! | ||
| + | |||
| + | ==== Building - Uploading ==== | ||
| + | |||
| + | Go to the microcontroller project directory in the cerealbox git. It should have a ''platformio.ini'' file in it, along with src/ and lib/ | ||
| + | |||
| + | '''You may have to stop cerealbot-serial.service first, if it's running.''' | ||
| + | |||
| + | My platformio.ini | ||
| + | <pre> | ||
| + | [env:diecimilaatmega328] | ||
| + | platform = atmelavr | ||
| + | framework = arduino | ||
| + | board = diecimilaatmega328 | ||
| + | # targets = upload | ||
| + | upload_port = /dev/ttyAMA0 | ||
| + | </pre> | ||
| + | |||
| + | To build and upload: | ||
| + | <pre> | ||
| + | cd ~/cerealbox/avr/printr_ctl | ||
| + | platformio run | ||
| + | platformio run --target upload | ||
| + | </pre> | ||
| + | |||
| + | === Makefile === | ||
Since I'm making use of the Arduino Bootloader to flash programs to the ATmega without ICSP, we're going to stick with regular "sketches" for now, not real microcontroller firmware. I do intend to mess with that later though. | Since I'm making use of the Arduino Bootloader to flash programs to the ATmega without ICSP, we're going to stick with regular "sketches" for now, not real microcontroller firmware. I do intend to mess with that later though. | ||
| Line 76: | Line 176: | ||
That should do it! Pretty straightforward really. | That should do it! Pretty straightforward really. | ||
| − | + | ==== Compiling Stuff ==== | |
Go into a source folder with a .ino file: | Go into a source folder with a .ino file: | ||
| Line 105: | Line 205: | ||
</pre> | </pre> | ||
| − | |||
| − | + | === Links === | |
| − | + | ||
| − | + | ||
| − | + | ||
| − | + | ||
| − | + | ||
| − | + | ||
| − | + | ||
| − | + | ||
| − | + | ||
| − | + | ||
| − | + | ||
| − | + | ||
| − | + | ||
| − | + | ||
| − | + | ||
| − | + | ||
| − | + | ||
| − | + | ||
| − | + | ||
| − | + | ||
| − | + | ||
| − | + | ||
| − | + | ||
| − | + | ||
| − | + | ||
| − | + | ||
| − | + | ||
| − | + | ||
| − | + | ||
| − | + | ||
| − | + | [http://www.arduino.cc/en/uploads/Hacking/Atmega168PinMap2.png Arduino168/328 Pinmap] | |
| − | + | ||
| − | + | ||
| − | + | ||
| − | + | ||
| − | + | ||
| − | + | ||
| − | + | ||
| − | + | ||
| − | + | ||
| − | + | ||
| − | + | ||
'''AMT1001''' | '''AMT1001''' | ||
Latest revision as of 20:51, 18 March 2016
Contents
[hide]AVR?
To make the Cerealbot code work, you have to have some sort of AVR microcontroller. This can range anywhere from a full-fledge Arduino, to a somewhat cheaper Diavolino, to a bare breadboarded ATmega328.
I'm using a Diavolino wired to the RPi via GPIO headers. Again, there are good resources out there, no need to copy me exactly.
Wiring to RPi Headers


There are two ways I'm interested in using to program the ATmega: UART and ISP. UART uses the RX/TX pins on the controller, is a little safer, and requires the Arduino bootloader. ISP Uses MISO/MOSI and writes the chip directly, no bootloader required. Either method is straightforward with a tool such as an ISP programmer or FTDI adapter, this page is for detailing methods to cut those out and instead use the RPi headers.
UART - bootloader
On the Pi's headers, there's a default serial Rx/Tx associated with /dev/ttyAMA0 and console boot. We're going to yank it away from the OS and use it to speak with and program the ATmega328.
I'm using a high-low logic level converter to protect the Pi. This is crucial; the arduino is capable of burning out the headers on the Pi without some sort of voltage divider. You can also just use a resistor, just make sure the arduino cannot push 5V back onto the Pi.
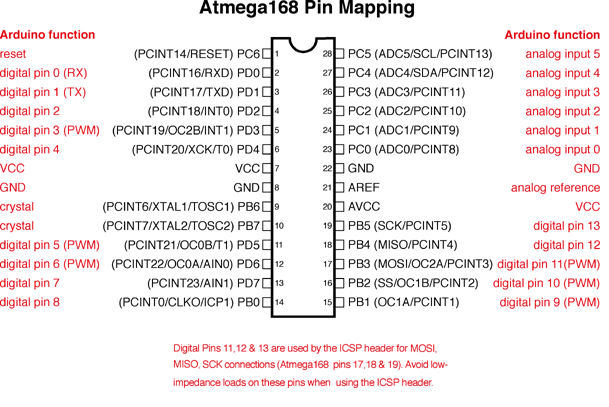
The following table uses the HARDWARE (aka "Board") GPIO mappings! You can reference this image, and use the numbers in the circles, not by the labels!
| Arduino Pin | ATmega328 Pin | RPi GPIO |
|---|---|---|
| Rx (0) | PD0 (2) | UART0_TXD (8) |
| Tx (1) | PD1 (3) | UART0_RXD (10) |
| GND | GND (8,22) | GND (6) |
| RTS (RST) | PC6 (1) | GPIO (11) |
Connect Vcc and GND pins from the Arduino to an external source, I don't suggest wiring them to the header.
Configure UART0
We need to kick Rasbian off of the header GPIO:
At the end of /etc/inittab, change
#Spawn a getty on Raspberry Pi Serial line
T0:23:respawn:/sbin/getty -L ttyAMA0 115200 vt100
To:
#Spawn a getty on Raspberry Pi Serial line
#T0:23:respawn:/sbin/getty -L ttyAMA0 115200 vt100
In /boot/cmdline.txt, remove any of console=ttyAMA0,115200 or kgdboc=ttyAMA0,115200
Create /etc/udev/rules.d/80-gpio.rules, and add:
KERNEL=="ttyAMA0", SYMLINK+="ttyS0",GROUP="dialout",MODE:=0666
ISP - no bootloader
This works... I know it... But I need to go back and verify at some point. Email me if you need this.
Toolchain
I recommend using PlatformIO over a makefile.
PlatformIO
An alternative that I'm testing to makefiles is PlatformIO. Suffice to say its a pretty promising system to help extend the Arduino sketch to as many MCUs as possibly with minimal effort. Installation on my desktop was straightforward, but there's a gotcha or two to setting it up on the RPi.
ArchlinuxArm requires:
- ncurses5-compat-libs
- libftdi-compat
- libtinfo (6-7 also provides libtinfo.so.5 file)
Install - Raspbian - RPi 2
Check that python2.7 and pip are installed.
Make sure pip, setuptools, and virtualenv are updated.
sudo pip install --update pip
sudo pip install --update setuptools
sudo pip install --update virtualenv
Create and activate our pio_env space for platformio:
# Create virtual environment:
virtualenv ~/pio_venv
# Effectively set the venv as python's locus:
source ~/pio_venv/bin/activate
# When you're done with the venv, close with:
#deactivate
Run deactivate only when you're done working with platformio. Next we need to install platformio and scons:
pip install --egg SCons
pip install platformio
If you receive an error about '--egg' then re-do the pip install --update commands above to make sure the tools in the venv are up-to-date. Now we need to get the right build tools through platformio:
platformio platforms install atmelavr
If you're using a USB programmer, that should be it! Otherwise, see the section below to set things up for programming over the ATmega's Rx/Tx lines.
Configure for UART GPIO
If you've got a bootloader on the ATmega, wire it as discussed above, and then set things up for PlatformIO to be able to program the chip. To do this you must have transparent 'sudo' installed, which drops you into root without asking for a password. This is the default behaviour for Raspbian. I'd like to find some other way to do this privilege escalation.
Go get a version of avrdude-rpi:
cd ~
git clone https://github.com/ctag/avrdude-rpi.git
This was initially created by deanmao. I've only tweaked some things to my liking.
Then, use these new files to transparently add DTR bumping to avrdude:
cd ~/.platformio/packages/tool-avrdude
mv avrdude avrdude-original
cd ~/avrdude-rpi
cp avrdude-autoreset ~/.platformio/packages/tool-avrdude/avrdude
cp autoreset ~/.platformio/packages/tool-avrdude/autoreset
Now PlatformIO should be able to write a new program to the ATmega via the arduino bootloader!
Building - Uploading
Go to the microcontroller project directory in the cerealbox git. It should have a platformio.ini file in it, along with src/ and lib/
You may have to stop cerealbot-serial.service first, if it's running.
My platformio.ini
[env:diecimilaatmega328]
platform = atmelavr
framework = arduino
board = diecimilaatmega328
# targets = upload
upload_port = /dev/ttyAMA0
To build and upload:
cd ~/cerealbox/avr/printr_ctl
platformio run
platformio run --target upload
Makefile
Since I'm making use of the Arduino Bootloader to flash programs to the ATmega without ICSP, we're going to stick with regular "sketches" for now, not real microcontroller firmware. I do intend to mess with that later though.
Compiling sketches without a graphical X server has apparently been an issue for some time with Arduino folk. Even though the official IDE touts CLI building, it fails without a X screen for me.
Install packages:
sudo apt-get install arduino-mk arduino-core avrdude avr-libc gcc-avr
Setup the GPIO reset workaround:
git clone https://github.com/deanmao/avrdude-rpi
cd avrdude-rpi
sudo mv /usr/bin/avrdude /usr/bin/avrdude-original
sudo ln -s /home/pi/avrdude-rpi/avrdude-autoreset /usr/bin/avrdude
sudo ln -s /home/pi/avrdude-rpi/autoreset /usr/bin/autoreset
That should do it! Pretty straightforward really.
Compiling Stuff
Go into a source folder with a .ino file:
cd ~/cerealbox/avr/src
make clean
make
sudo make raw_upload
Output from make raw_upload should be like:
pi@bns-daedalus ~/cerealbox/avr/src $ sudo make raw_upload
/usr/bin/avrdude -q -V -p atmega328p -C /etc/avrdude.conf -c arduino -b 57600 -P /dev/ttyAMA0  \
                -U flash:w:build-cli/printr_avr.hex:i
done with autoreset

avrdude-original: AVR device initialized and ready to accept instructions
avrdude-original: Device signature = 0x1e950f
avrdude-original: NOTE: FLASH memory has been specified, an erase cycle will be performed
                  To disable this feature, specify the -D option.
avrdude-original: erasing chip
avrdude-original: reading input file "build-cli/printr_avr.hex"
avrdude-original: writing flash (4902 bytes):
avrdude-original: 4902 bytes of flash written

avrdude-original: safemode: Fuses OK
Links
AMT1001
http://davidegironi.blogspot.com/2013/07/amt1001-humidity-and-temperature-sensor.html#.VXOzO5Tve00
SURE Electronics 3208
http://store.sure-electronics.com/led/de-dp13119
http://forum.arduino.cc/index.php?topic=167753.0
http://playground.arduino.cc/Main/HT1632C
https://github.com/gauravmm/HT1632-for-Arduino <- Awesome
http://bailey.st/blog/2011/07/12/how-to-connect-sure-electronics-8x32-led-matrix-display-to-arduino/ <- Wiring
GPIO To Arduino
http://www.evilmadscientist.com/2010/diavolino/
http://www.atmel.com/Images/doc8161.pdf
http://www.raspberrypi-spy.co.uk/2014/07/raspberry-pi-b-gpio-header-details-and-pinout/
https://github.com/deanmao/avrdude-rpi
http://www.deanmao.com/2012/08/10/uploading-sketches-to-the-arduino-on-the-pi/
http://spellfoundry.com/sleepy-pi/setting-arduino-ide-raspbian/