Difference between revisions of "Shop Table"
From Makers Local 256
(→Shelf [1]: add picture depicting shelf holes) |
(add comment about design origin) |
||
| Line 1: | Line 1: | ||
{{Project|Creator=opticron | {{Project|Creator=opticron | ||
| − | |Status=<onlyinclude> | + | |Status=<onlyinclude> Implemented </onlyinclude> <!--LEAVE ONLYINCLUDES FOR STATUS HACK--> |
|Born On=21:59, 1 May 2009 (CDT) <!--DO NOT EDIT --> | |Born On=21:59, 1 May 2009 (CDT) <!--DO NOT EDIT --> | ||
|Last Updated={{#time: H:i, d F Y| {{REVISIONTIMESTAMP}} }} (CDT) <!--DO NOT EDIT --> | |Last Updated={{#time: H:i, d F Y| {{REVISIONTIMESTAMP}} }} (CDT) <!--DO NOT EDIT --> | ||
| Line 6: | Line 6: | ||
==Overview== | ==Overview== | ||
| − | This is the official design for stool height shop tables with dry-erasable tops. The end cost is targeted to be somewhere around $80. | + | This is the official design for stool height shop tables with dry-erasable tops. The end cost is targeted to be somewhere around $80. The design was created by [[User:korc|korc]] and the instructions were created and refined by [[User:opticron|opticron]] |
==Materials List== | ==Materials List== | ||
Revision as of 08:05, 4 May 2009
|
Creator: |
Contents
[hide]Overview
This is the official design for stool height shop tables with dry-erasable tops. The end cost is targeted to be somewhere around $80. The design was created by korc and the instructions were created and refined by opticron
Materials List
- 2"x4"x40" [6] (legs)
- 2"x4"x47.5" [4] (short horizontal supports)
- 2"x4"x44.5" [4] (middle horizontal supports)
- 2"x4"x92.5" [4] (long horizontal supports)
- 4'x8'x0.75" MDF [1] (base table surface)
- 4'x8' dry-erase showerboard material [1] (replacable top surface)
Assembly
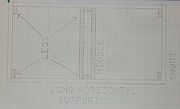
Support Frame [2]
- Place the long horizontal supports 44.5" apart.
- Cap them with the short horizontal supports.
- Center the two middle horizontal supports 3.5" apart between the long horizontal supports.
- Drill 2 holes for each joint, countersink them, and secure them with screws.
- Drill 4 holes for securing the legs and countersink them.
- Secure all joints with 2 screws.
Shelf [1]
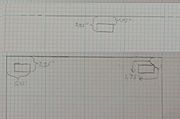
- Make holes for the 2"x4" legs.
- Mark 5.25" and 1.75" in from a corner on a short side.
- Mark 3.25" and 1.75" in from a corner on the adjacent long side.
- Cut out the rectangle formed by these four markings.
- Mirror the hole to all four corners.
- Mark 1.75" on either side of the center of the long sides.
- Mark 3.25" and 1.75" deep from the center of the long sides.
- Cut out the rectangle formed by these four markings.
- Alternatively, make notches for the 2"x4" legs.
- Mark 5.25" in from each side on the short sides.
- Mark 3.25" in from each side on the long sides.
- Notch each corner according to the markings.
- Mark a notch in the middle of the long sides 3.5" wide and 3.25" deep.
- Notch the middle of the long sides as marked.
- Attach the shelf to the top of one of the support frames.
- Slide legs through the remaining holes.
- Secure the legs such that the top of the shelf is 1' off the ground.
Top [1]
- If necessary, bevel the edges of the MDF using a router.
- Attach the MDF to the top of the remaining support frame with screws.
- Set the MDF support frame on top of the legs.
- Use 4 screws per leg to secure the legs to the top.
- Staple the whiteboard slab to the MDF.

