Difference between revisions of "DIY Freeze Dryer"
Candleknight (Talk | contribs) (Added research link on Peltier cooling devices) |
Candleknight (Talk | contribs) (Added link to vacuum tech pdf) |
||
| Line 90: | Line 90: | ||
[http://www.unesco.org/webworld/ramp/html/r8707e/r8707e00.htm#Contents Using Vacuum Freeze-Drying to Salvage Water-Damaged Archival Materials]<br> | [http://www.unesco.org/webworld/ramp/html/r8707e/r8707e00.htm#Contents Using Vacuum Freeze-Drying to Salvage Water-Damaged Archival Materials]<br> | ||
[http://science.howstuffworks.com/innovation/edible-innovations/freeze-drying2.htm HowStuffWorks.com: Freeze Drying]<br> | [http://science.howstuffworks.com/innovation/edible-innovations/freeze-drying2.htm HowStuffWorks.com: Freeze Drying]<br> | ||
| + | [http://isnap.nd.edu/Lectures/urls/Introduction_to_vacuum_gauges.pdf Introduction to Vacuum Gauges] and other vacuum technology<br> | ||
[http://inventors.about.com/library/inventors/blfrdrfood.htm About.com Inventor: Freeze Drying & Freeze Dried Food]<br> | [http://inventors.about.com/library/inventors/blfrdrfood.htm About.com Inventor: Freeze Drying & Freeze Dried Food]<br> | ||
Revision as of 09:22, 17 October 2012
|
Creator: |
Overview
This is a project to try and build a reasonably priced, reasonably functional, freeze drying machine at home.
Purpose
Commercially available freeze drying units, even relatively small ones, are really expensive. We're talking in the thousands of dollars. This got me to thinking. In theory at least, the physics behind freeze drying and how it works aren't terribly complicated, so I figure I'll give a crack at making a decent one from scratch and save myself a few thousand bucks, and if it works other people on the internet will be able to follow my instructions and build one for themselves as well.
Info
Progress
Acquire Vacuum Pump
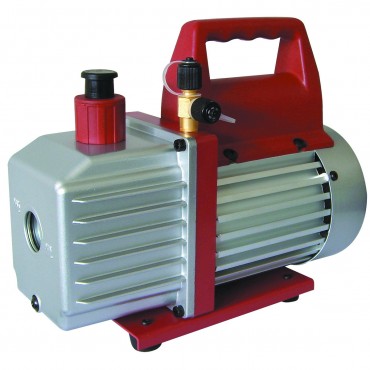
- Found a vacuum pump on sale at harbor freight for $110. It pumps 3cfm and is rated to pull a vacuum down to 3 Pascal. I believe it is supposed to be used to pull a vacuum to clean out AC systems and refrigeration coils.
Vacuum Pump and Connector System Prototype
- The vacuum pump I got has 2 input ports: 1/4" SAE & 1/2" Acme. Finding stuff to fit these decently was a giant pain in the rear, but I've finally managed to get a setup that is tightly sealed, readily available, and not too expensive.
- Go to the plumping section in Lowes (or where ever) and get 1/4" polyethylene tubing. It's milky white, the same size as fish tank tubing, and about $2 for a 25' coil. You'll also want to get the 1/4" brass compression connectors that fit it. I've found that with good use of teflon thread tape the 1/4" female connector will fit pretty well on the 1/2" Acme connector of the vacuum pump. Don't ask me why, the people that categorize hardware just pick whatever measurements they feel like using to describe stuff, it seems. Probably the same people that decided that 2x4 planks would be 1.5"x3.5".
- Anyways, at minimum you're going to need these connectors:
- 1x 1/4" FIP to compression
- 2x T-shaped compression-compression valve
- 1x T-shaped 3 way compression coupling
- Use thread tape and screw the female adapter onto the vacuum pump.
- Then use tubing to connect that to the first T valve
- This first valve is your main flow control valve. You need it so you can seal off the system after you've pulled a vacuum. If you don't have it, then once you turn the vacuum pump off the vacuum in the chamber starts pulling air backwards through the pump. This degrades your vacuum pretty quickly, but even worse it can pull oil from the compressor trough the lines and contaminate your entire system. I found that one out the hard way. It is not fun.
- Your order of operations should be:
- Turn on pump
- Open Valve
- Pull vacuum
- Close valve
- Turn off pump
- Connect that to the T splitter
- One end of the T splitter should connect to the second T Valve
- This second valve is your release valve and just connects to the open air. You need it to let air back into the vacuum chamber once you're done. Other wise you have to try and pry the lid off, and 14.7 psi makes that really difficult in most cases.
- The other connection on the T splitter is the main line that runs to the vacuum chamber
Vacuum Chamber Prototype, Proof of Concept
- Instructions coming soon --Candleknight (talk) 13:12, 29 February 2012 (CST)
Next Steps
Vacuum Chamber Construction
Door
It may be overkill, but I'm thinking of using a 1/2" sheet of Polycarbonate (Lexan) from eStreetPlastics for the door. With more careful analysis and design I could probably use a thinner sheet, but I've never built a vacuum chamber before so I'm overdesigning the crap out of this one. Also, you could skip this material altogether and just use the side of the pressure vessel that you cut off as the door, but I want to be able to see into the chamber.
I chose polycarbonate (Lexan) over acrylic (Plexiglass) because the polycarbonate is much stronger, more resilient, and has a higher working temperature.
Polycarbonate:
- Melting temperature (Tm) 267 °C*
- Glass transition temperature(Tg) 150 °C
- Upper working temperature 115–130 °C
- Lower working temperature −40 °C
- Young's modulus (E) 2.0–2.4 GPa
- Tensile strength (σt) 55–75 MPa
- Compressive strength (σc) >80 MPa
- Elongation (ε) @ break 80–150%
- Poisson's ratio (ν) 0.37
Chamber Body
After some consideration, I'm thinking of using some sort of pre-constructed pressure vessel as the body of the vacuum chamber. Something like a propane tank, or a compressed air tank. My reasoning is that, at least for medium scale, if something is designed to hold 140 psi positive pressure, then it should maybe probably be able to hold 14.7 psi negative pressure. Yeah yeah yeah, I know that the structural design for the two things is not exactly the same, but I'm building in a factor of safety of nearly 10x, so I'm modestly confident that this won't implode.
I'm thinking that an old 10 to 20 gallon auxiliary compressed air tank will be a good place to start with this design. My plan is to use a torch, plasma cutter, or angle grinder cutoff wheel to cut off one end(one of the rounded ends). That will leave a round, flat opening on that end. I'll then weld on some sort of flange, add some sort of o-ring / seal, and then the Lexan door should just sit flush against it.
Vapor Deposition Cryo-coils/Condenser Plates?
Still looking into this to see if it's really necessary
- UPDATE(2/28/12): After playing with the prototype mason jar vacuum chamber I have concluded that this element will, in fact, be necessary. Even doing small slices of apple, the water vapor destroys the vacuum completely in less than 10 minutes. So unless I want to run the vacuum pump continuously, I'm going to have to put in Vapor Deposition Cryocoils.
- I need to do some more research on this subject, but initially I'm thinking that pulling the coils out of a mini fridge, portable/mini freezer, window A/C unit, or something like that might do the job.
- May have to consult with a HVAC professional about cutting & reattaching the lines, since I'll need some way to get them trough the wall of the vacuum chamber.
- Might could just make notches at the seal to do this more easily.
- I need to do some more research on this subject, but initially I'm thinking that pulling the coils out of a mini fridge, portable/mini freezer, window A/C unit, or something like that might do the job.
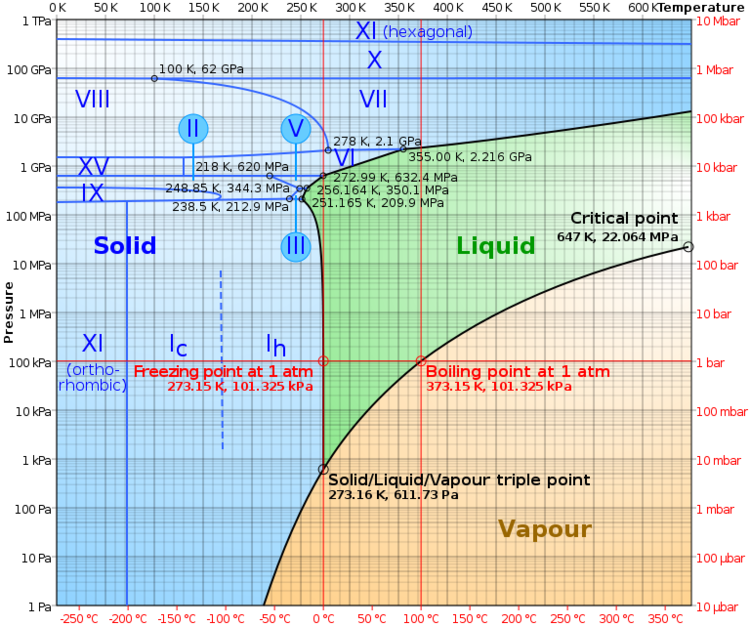
- UPDATE(2/29/12): I'm very optimistic now that the refrigeration coils from a standard chest freezer should be sufficient for this task. The information I'm finding on the web indicates that the coils themselves can easily achieve temperatures around -25°C (~248°K) under normal operation. If you look at the phase diagram above you'll see that at -25°C water would be solid phase at any pressure above about 60 Pascal. This gives the system a pretty decent operating range for pressures (~60Pa - 611.73Pa) without requiring any specialized cryogenic equipment.
- Below about 60 Pascal the water vapor in the chamber would not be able to collect and freeze on the -25°C coils. It would instead just accumulate as vapor in he chamber, raising the pressure until it was high enough for water molecules to freeze as ice on the coils. This freezing would in turn lower the pressure, meaning that there should be a stable equilibrium pressure of ~60Pa ideally. That's an ideal scenario that assumes that there's nothing in the chamber but water vapor. In practice the equilibrium pressure will probably be a skooch higher.
- Above 611.73Pa ice will no longer sublimate, but will start going through the water phase again.
Ideas
Resources
Research
Basics of Vacuum Technology
Using Vacuum Freeze-Drying to Salvage Water-Damaged Archival Materials
HowStuffWorks.com: Freeze Drying
Introduction to Vacuum Gauges and other vacuum technology
About.com Inventor: Freeze Drying & Freeze Dried Food
Building a Freeze Dryer; Forum Discussion at Refrigeration-Engineer.com Posts# 15 and 2 are especially useful
Building a Freeze Dryer: Revisited; Forum Discussion at Refrigeration-Engineer.com
Peltier Cooler: info page on heatsink-guide.com
Polycold PFC Cryopumps Page 2 Has a useful table
[1]

