USB Auth
Here's the video of the project: http://www.youtube.com/watch?v=Fa5RuWM1fEM
Contents
[hide]USB Authentication
Pros
Each USB device has a unique serial ID. USB keys are cheap, readily available, and many can fit on a standard metal keyring.
Cons
Implementation
Authentication Flow
- User inserts key into USB hub hooked to a PC
- Computer reads serial ID of key
- Computer compares serial ID to list of valid serial ID in a table \ DB \ Flat File
- If good, computer writes data ("Unlock!") to USB line of Microcontroller
- Microcontroller instructs servo to go to unlocked position for 5-10 seconds.
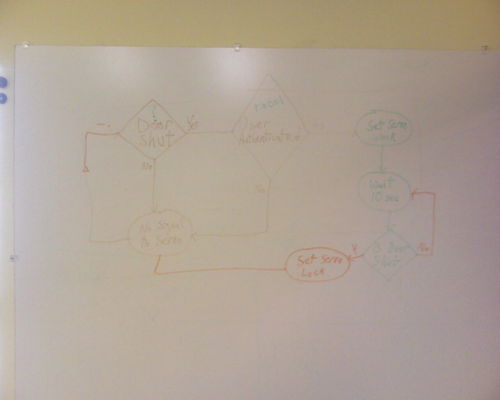
The flowchart for the circuit is below.
Parts List
- Servo $12
- Tubberware $6
- Freeduino Development Board $36
- Breadboard $5(?)
- Solder, Soldering Iron (On Hand)
- 15k Ohm Resistors (On Hand)
- Button (On Hand)
- Powered USB Hub ? (Necessary: for powering Freeduino with only USB and a laptop)
- Unpowered UBS Hub (Optional: Hub to put outside of door to plug USB keychains into)
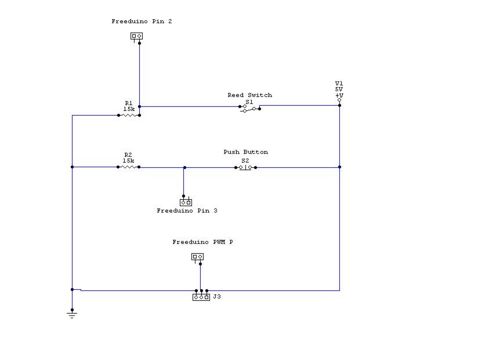
Electrical Interface
Electrical Interface by Omegix
Note: "Freeduino PWM Pin P" Should be "Freeduino PWM Pin 9"
Mechanical Interface
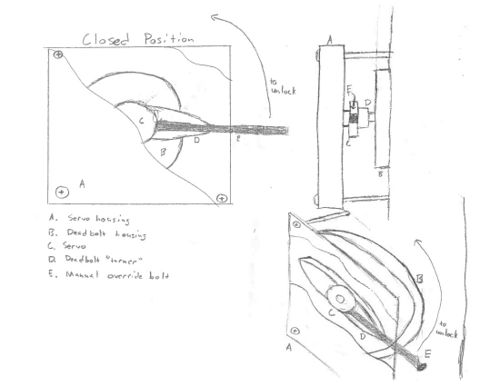
Mechanical Override
Mechanical Interface design by Gregabyte
Note: Mechanical override will not be implemented till after Phreaknic Omegix 14:58, 21 October 2008 (CDT)
The idea here is to have a servo attached to a standard deadbolt. The microcontroller will need to not only receive a signal from the computer, but also sense a window-open detector, and control a servo.
If you were to attach the stick to the deadbolt turner or the plastic connected to the servo motor shaft, that would allow for a manual unlocker for the door in the event of a power failure
This image from Gregabyte shows a mechanical override system that could be implemented for under $20
Code
USB Reader Code
Coded by Brimstone
#!/bin/sh

# variables!
mymu=A6005ycb
mydev=/dev/ttyUSB0
mydb=usb-keys.txt

# first, define some common functions
function lsserial {
	lsusb -v | awk '/iSerial/ {if ($2 == "3" || $2 == "2") {print $3}}'
}

# figure out whats attached
# check for our microcontroller
if [ $(lsserial | grep -c $mymu) = 0 ] ; then
	echo -n "I don't see the microcontroller "
	if [ -e $mydev ]; then
		echo "but we have a $mydev ?"
	else
		echo
	fi
	exit 1
else
	if [ ! -e $mydev ]; then
		echo "I see the microcontroller, but no $mydev"
		exit 1
	fi
fi

if [ -e $mydb ] ; then
	echo "Found serials for the following people:"
	awk -F, '{print $1}' $mydb
else
	echo "Didn't find keyfile $mydb"
	exit 1
fi

# all good, lets go
preserial=$(lsserial | grep -v $mymu)
if [ -n "$preserial" ]; then
	echo "I've detected the following serial devices already:"
	echo $preserial
fi

echo "Ready and waiting"

# main loop that watches /var/log/messages
(
	tail -n 0 -f /var/log/messages | awk '/new.*USB device/ {print "Attached"; fflush()} /USB disconnect/ {print "Dettached"; fflush()}'
) | (
# main loop that reads that cleaned /var/log/messages
	while read cmd; do
		if [ $cmd == "Attached" ] ; then
			for ser in $(lsserial | grep -v $mymu); do
				echo "Checking for $ser in flat file"
				if [ $(grep -c $ser $mydb) = 1 ]; then
					name=$(awk -F, "/$ser/ {print \$1}" $mydb)
					echo "Unlocking for $name!"
					echo -n U > $mydev
					error=$?
					if [ $error != 0 ]; then
						echo "There was an error ($error) writing to $mydev"
					fi
				else
					echo "Didn't find it in flat file"
				fi
			done
		else
			echo "Got $cmd but nothing implemented for it"
		fi
	done
)
Freeduino Code
Coded by Omegix
#include <Servo.h>

#define interrupt1PinA 3

volatile unsigned int interrupt1Value = 0;

char incomingChar = 0;
Servo myServo;
int pos;
int DoorSensePin = 2;  //this is the PIN that the reed switch is connected to
int lockedPosition = 115;  //This is the value that the servo wants to be at the correct physical position
int unlockedPosition = 28;  //This is the value that the servo wants to be at the correct physical position

boolean HasForceUnlockHappened = 0;  //this is used by the interrupt routine as a workaround to using timers

void setup()
{
  Serial.begin(9600);
  Serial.flush();

  myServo.attach(9);  // attaches the servo on pin 9 to the servo object
  Lock();  //default to locked position at powerup
  //myServo.write(28); //default to locked at powerup

  pinMode(DoorSensePin, INPUT);  //designate pin2 as a sensing (input) pin
  pinMode(interrupt1PinA, INPUT);

  attachInterrupt(1, ForceUnlock, HIGH);  //when interrupt happens, run ForceUnlock function
}

void ForceUnlock() //it is important that no timer related functions happen during an interrupt routine
{
    Serial.println("Force Unlock Button Pressed! Interrupt Called!");
    myServo.write(unlockedPosition);  //cannot call regular Unlock function as it has a delay() call
    HasForceUnlockHappened = 1;
}


void loop()
{
  //Serial.println("In Main Loop");  //TROUBLESHOOTING LINE
  if (HasForceUnlockHappened == 1) //if an interrupt driven ForceUnlock has happened, then need to WaitToLock
  {
    HasForceUnlockHappened = 0;  //reset till next interrupt
    WaitToLock();
  }
  if (Serial.available() > 0)
  {
     incomingChar = Serial.read();

     Serial.print("I recieved: ");
     Serial.println(incomingChar, DEC);
     //Serial.print("The DoorSense Value is: ");
     //Serial.println(IsDoorOpen(), DEC);

    // Code for Unlocking Door.  Unlock does not care if door is closed or not.
    if (incomingChar == 85) //"U" is 85 in DEC.  U is for Unlock
    {
           Serial.println("Unlocking!");
           Unlock();
    }

    //Code for Locking Door.  Lock cares if door is open or closed.
    if (incomingChar == 76)  //"L" is 76 in DEC.  L is for Lock
    {
         if (IsDoorOpen() == 0)
         {
           Serial.println("Locking!");
           Lock();
         }
         if (IsDoorOpen() == 1) { Serial.println("Door is Open!!"); }
    }

  }// if serial end
}//loop end

//IsDoorOpen should return a 1 if Door is Open, and a 0 if Door is Closed.
boolean IsDoorOpen()
{
  if (digitalRead(DoorSensePin) == 1) { return 1; }
  if (digitalRead(DoorSensePin) == 0) { return 0; }
}


  void Unlock()
  {
    myServo.write(unlockedPosition);
    delay(100);
    WaitToLock();
  }

  void Lock()
  {
    myServo.write(lockedPosition);
  }

//This function will loop until the door is closed for 5 seconds and then Lock.
void WaitToLock()
{
BeginWaitingToLock:
   while (IsDoorOpen() == 1)  { /* Serial.println("Door Needs to Close.");    /* do nothing */ }
   //At this point Door should have shut
   Serial.println("Door has been shut! Waiting 5 seconds.");
   delay(1000 * 5); //wait 5 seconds
   if (IsDoorOpen() == 0) // if door is still closed after delay, then lock
   {
      Lock();
   }
   if (IsDoorOpen() == 1)
   {
     Serial.println("Door Did not remain shut.  Starting over loop.");
     goto BeginWaitingToLock;
   }

}


