Soda Machine/Cashless Device
|
Creator: |
Contents
Project overview
The soda machine supports MDB, the Multi Drop Bus. It's used for talking to coin hoppers, bill validators, and, notably, "cashless devices" (that is, card readers). This project is to implement an MDB cashless device so that make shop members are able to pay for soda with their NFC tags directly.
Components
- Arduino running a fork of Reaktor23's MateDealer
- Communicates with the vending machine control board.
- ESP8266 running... something (D1 Mini Was Used)
- Server to store levels of funds and etc.
Arduino IDE Setup
- Use this guide to setup D1 Mini: https://averagemaker.com/2018/03/wemos-d1-mini-setup.html
- Note the board you select will be called "(LOLIN)Wemos R1 & D1 Mini"
- For the 8266 Board, you will need to use Version 2.4.2 (may be able to use later, but the 2.5.0 didn't work)
- For the ArduinoJson you will have to use 5.13.4 (later versions deprecate one of the features used in the code).
More-or-less high-level overview of payment operations
MDB is a pretty confusing protocol, but I can describe the subset that we will be using, and the flow of "states" within our cashless device. One thing you have to know is that the VMC (vending machine controller) is always POLLing all its peripheral devices on the MDB. The peripherals can't talk unless the VMC has addressed them first.
Startup
- The VMC polls us, and we say we have just finished resetting.
- The VMC sends us its configuration data. We respond with our configuration data.
- The VMC sends us its pricing data (config stage 2). We acknowledge this.
- The VMC keeps polling us and we keep acking to say that we are not dead.
Now we are in the idle state.
User presents payment
- The VMC polls us, and we say that we have a user trying to begin a payment session.
- We can pass an amount of currency as the session begin amount, and the VMC displays it as the amount of credit that has been inserted by the user.
- The VMC tells us the user is trying to buy something that requires a payment of, let's say, 50 cents. We acknowledge this and we run off to verify that the user can afford this 50 cent charge.
- The VMC polls us, and we say that the user's payment is approved.
- If the vend fails, the VMC tells us that. We ack this, refund the payment, and close the payment session.
- If the vend succeeds, the VMC tells us that. We ack this and debit the user 50 cents.
- The VMC tells us the session is complete. We acknowledge this.
- The VMC polls us, and we say that we have ended the payment session.
Now we're in the idle state again.
Nuts and bolts
Okay, so how are we going to make a useful cashless device?
Talking on the MDB
Rather than reinventing the wheel, this piece is based *heavily* on the Arduino piece of the Mate Dealer project done by Bouni of the Reaktor23 hackerspace. This uses an Arduino Mega2560, although if you have an Atmega2560 then you don't really need it to be an Arduino. This chip is chosen because it has four hardware USARTs. We use one of the USARTs to communicate the ridiculous 9-bit serial protocol that MDB requires, and we use another to talk with the PC, or whatever is handling the money.
Gotchas
Inverted serial
When I first tried to use the MateDealer AVR code to listen to the MDB, it would not talk on the bus. It thought none of the commands were destined for cashless devices. I added some debug statements to try to decode the bits manually, but none of the data was making any sense. I tried to decode it by the spec but the data simply did not produce reasonable commands according to the spec I had.
When I connected a Bus Pirate to the bus, I realized that the data made sense if I used the inverted mode of the UART on the device. So I needed to invert the serial bus. The PIC in the Bus Pirate did this in hardware, no big deal, it's just a flag on the UART. But the Atmega2560 has no such flag. So, for the VMC->Arduino connection, I connected it through a 'NOT' gate. Now the data made sense, and the MateDealer was initialized by the VMC.
Disabled state
According to the MDB spec, you boot up idle, then you wait for setup by the VMC, and then you go into the "disabled" state. This is the state when the VMC doesn't want you to accept any payment cards. However... this is as far as it got. For some reason, our soda machine never wanted to enable the card reader.
To fix this, I just... fudge it. When I receive the last serial data from the VMC, I just hack the state machine - I go to the "enabled" state instead of the "disabled" one. This means I violate the MDB spec, but it works fine. Maybe the firmware in our VMC has a bug, who knows, but it works like this.
Lockup after successful vend
The MateDealer code, as it was, worked fine to vend a soda! But, afterward, the VMC displayed our balance, minus the 50 cents we just paid for a soda, but nothing would respond. It was possible to start another payment session from the cashless device, but until we did that, the VMC was totally unusable. Service menus were inaccessible, and "ICE COLD COCA COLA" was not scrolling. Only a reboot seemed to fix this.
It turns out that MateDealer's state machine is not implementing MDB exactly; rather, it accommodates an oddity in Reaktor23's vending machine. Once a vend is successful, the VMC sends "session complete," and we are supposed to respond with "end session" to confirm. MateDealer simply responded "ACK" and went back to the idle state. But the Makers Local soda machine would wait for up to *five minutes* (the MDB spec default non-response time) for the "end session" message. Now that I patched MateDealer to send the "end session" message, the session ends immediately.
Installing vending machine hardware
Microcontroller platform
Since we need both an ATmega2560 and an ESP8266 for this project, I sought out a board that would contain both. I found the MEGA+WiFi R3. Here is the procedure I used to load the code onto this thing.
- Set the DIP switches to 00110000 in order to program the ATmega. (I got this info from the link above.)
- Hack the makefile to use avrdude -D (the option in avrdude to not erase the flash first).
- make program
- Set the DIP switches to 00001110 in order to program the ESP8266. The document says you have to hold the Mode button, but this is a bald faced lie as far as I can tell.
- In the Arduino IDE, select Generic ESP8266 Module, DIO, 40MHz flash, 80MHz CPU, 1M flash, 64k SPIFFS, no debug options, reset with ck, upload at 921600. You HAVE to pick the smallest SPIFFS possible, because with only a 1MB flash, we have to save a lot of room in order to have enough free flash to do OTA. (We have to fit TWO copies of the sketch PLUS SPIFFS into flash to do OTA.)
- Upload.
- Set the DIP switches to 11000000 in order to connect the ESP8266 to the ATmega.
- Set the other switch to RXD0/TXD0 in order to connect to UART0 of the ATmega, since that is where MateDealer talks. (Usually this would be connected to the onboard USB UART, especially on a normal Arduino Mega.)
Shield for connecting to the vending machine
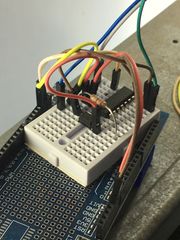
My shield was prototyped with just a small breadboard. I based it heavily on the original MateDealer circuit, but I left some stuff out, at Bouni's advice.
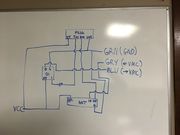
Once I had everything working perfectly, I made a terrible circuit diagram.
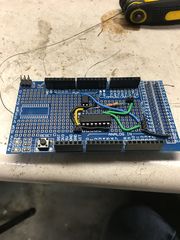
From this diagram, I built a slightly less terrible Proto Shield-based shield with this circuit on it. The top two-pin header is the tx and rx from the vending machine after interfacing, the bottom two-pin header is 5V and ground, and the three-pin header on the right will connect to the MDB.
MDB cable
This would be a good place to note what cable I bought.
Handling stored value and payments
I haven't done this part yet, so stay tuned, I guess.
Note to self: This is blocking on the ldap server upgrade to Debian 9, at which point it will grow a Postgres installation, at which point we can create the database for this.


