Difference between revisions of "Cerealbot"
m (Updated project status) |
m (Cleaned up main page) |
||
| Line 26: | Line 26: | ||
</gallery> | </gallery> | ||
| − | I | + | Whether I'm right or wrong, I feel that 3D printers of the reprap and home-use variant have been allowed to stagnate in a bad way. Regardless of an assortment of companies or model types, low cost 3D printers operate on roughly the same plane. And the plane isn't a good one: whereas I can incrementally fire off several dozen pages across multiple document types to our shop's laser printer from the comfort of my own home half an hour away, I can pretty much only 3D print while I'm present in the room prep the printer for each part. This project, Cereally 3D / Cerealbot / Cerealbox / whatever, is my attempt at fixing a few of the issues that keep FDM printers out of practicality for a range of use-cases by making a low cost 3D printer ''serialized'' (not cerealized). |
| − | + | ||
| − | + | ||
| − | + | ||
| − | 3D printers | + | |
| − | + | ||
| − | + | ||
It is my hope that this project will bring about an affordable printer that can be placed in a school and maintained in a low-overhead, ad-hoc manner. The serialization will also allow for maximal student use from each printer, meaning that more investigative minds have access to this technology. | It is my hope that this project will bring about an affordable printer that can be placed in a school and maintained in a low-overhead, ad-hoc manner. The serialization will also allow for maximal student use from each printer, meaning that more investigative minds have access to this technology. | ||
| Line 51: | Line 45: | ||
* Undated, X-12-2014 | * Undated, X-12-2014 | ||
** Milling the "production/testing" bed is next on the list. | ** Milling the "production/testing" bed is next on the list. | ||
| − | |||
| − | |||
| − | |||
| − | |||
| − | |||
| − | |||
| − | |||
| − | |||
| − | |||
| − | |||
| − | |||
| − | |||
| − | |||
| − | |||
| − | |||
| − | |||
| − | |||
| − | |||
| − | |||
| − | |||
| − | |||
| − | |||
| − | |||
| − | |||
| − | |||
| − | |||
| − | |||
| − | |||
| − | |||
| − | |||
| − | |||
| − | |||
| − | |||
| − | |||
| − | |||
| − | |||
| − | |||
| − | |||
| − | |||
| − | |||
| − | |||
| − | |||
| − | |||
| − | |||
| − | |||
| − | |||
| − | |||
| − | |||
| − | |||
| − | |||
| − | |||
| − | |||
| − | |||
| − | |||
| − | |||
| − | |||
| − | |||
| − | |||
| − | |||
| − | |||
| − | |||
| − | |||
| − | |||
| − | |||
| − | |||
| − | |||
| − | |||
== External Resources == | == External Resources == | ||
Revision as of 11:56, 27 May 2015
|
Creator: |
Contents
[hide]Map
Overview
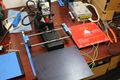
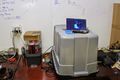
Unmodified Printer

Unmodified Printer
Concept Design
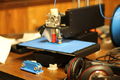
Prototype Frame
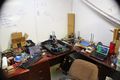
Workspace
Climate Container


Whether I'm right or wrong, I feel that 3D printers of the reprap and home-use variant have been allowed to stagnate in a bad way. Regardless of an assortment of companies or model types, low cost 3D printers operate on roughly the same plane. And the plane isn't a good one: whereas I can incrementally fire off several dozen pages across multiple document types to our shop's laser printer from the comfort of my own home half an hour away, I can pretty much only 3D print while I'm present in the room prep the printer for each part. This project, Cereally 3D / Cerealbot / Cerealbox / whatever, is my attempt at fixing a few of the issues that keep FDM printers out of practicality for a range of use-cases by making a low cost 3D printer serialized (not cerealized).
It is my hope that this project will bring about an affordable printer that can be placed in a school and maintained in a low-overhead, ad-hoc manner. The serialization will also allow for maximal student use from each printer, meaning that more investigative minds have access to this technology.
Progress Log
- 27-1-2015
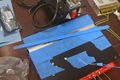
- Serious consideration needs to be taken for moving forward. I now know that this procedure works; the prototype works admirably given how it was constructed. The system needs a redesign, and I want to make sure I select the correct path going forward. Currently, the pop-bar lays in a channel milled into the bed, this is a holdover from when I imagined this procedure against the default printrbot build plate. The channel warps the build plate, so this design must go. I now think that the build plate could be constructed from three discrete parts, with the pop-bar laying between two separate plates of alum. There may also still be a better way to detach parts from the build plate, I'm not sure.
- 25-1-2015
- After several prints with the printrbot outside of its enclosure, it is apparent that some climate control is needed. Each print has warped and curled fairly heavily. A custom box must be constructed, or a large cardboard box must be found.
- The pop bar has worked well for the past dozen or so prints and failed prints. Collection of ways to remotely screw up the printer and then recover is growing quickly.
- I learned to NOT try melting plastic off of the print nozzle, because then the plastic inside will char and clog everything. Will test whether a lower temperature is appropriate.
- The print bed is warped, contributing to the jammed nozzle. I cannot determine if this happened while milling, or due to torque from mounting it on the printer. I rigged up a vice and flexed the plate back to near-level, but it appears to be bending again once remounted. Future print beds must be designed to minimize this.
- 22-1-2015
- The second pop-bar, which I am considering a true prototype, has been created and linked to an active servo.
- Undated, X-1-2015
- The testbed for train_rec was a success. Rather than use the length of the pop-bar as a lever to pry the piece off of the bed, I think its better to twist the bar along the length to push the 3d printed part up.
- Undated, X-12-2014
- Milling the "production/testing" bed is next on the list.
External Resources
Parts
Amazon is an OK outlet for GT2 gear/belt parts for the X-Y motion
Source for 2-3mm Hex Bolts like those used in the simple metal
MISC
Printrbot initial config guide
Protoparadigm plastic I'm interested in
Quick guide on authbind, which allows octoprint to bind port 80
http://hackaday.com/2013/10/23/3d-printering-a-call-for-an-open-source-automated-build-platform/
Glass is good for easy part removal
Other serial printers
http://forums.trossenrobotics.com/showthread.php?6311-One-more-robotic-3D-printer-assembler