Difference between revisions of "Cerealbot"
m (updated process to recover from glommed prints) |
m (→Overview: Removed contact information) |
||
| (88 intermediate revisions by 2 users not shown) | |||
| Line 1: | Line 1: | ||
| + | [[File:slodac_logo_1.png|borderless|right|200px|Open Design Project]] | ||
| + | |||
{{Project|Creator=ctag | {{Project|Creator=ctag | ||
| − | |Status=<onlyinclude> | + | |Status=<onlyinclude> Not serial </onlyinclude> <!--LEAVE ONLYINCLUDES FOR STATUS HACK--> |
|Born On=23:32, 13 December 2014 (CST) <!--DO NOT EDIT --> | |Born On=23:32, 13 December 2014 (CST) <!--DO NOT EDIT --> | ||
|Last Updated={{#time: H:i, d F Y| {{REVISIONTIMESTAMP}} }} (CDT) <!--DO NOT EDIT --> | |Last Updated={{#time: H:i, d F Y| {{REVISIONTIMESTAMP}} }} (CDT) <!--DO NOT EDIT --> | ||
}} | }} | ||
| − | == | + | == Map == |
| − | + | [[Cerealbot/Hardware]] - General tomfoolery and notes on random hardware design | |
| − | + | ||
| − | + | ||
| − | + | ||
| − | + | ||
| − | + | ||
| − | + | ||
| − | + | ||
| − | + | [[Cerealbot/Plastics]] - Log of what plastic filaments work | |
| − | + | [[Cerealbot/rpi]] - Setting up the Raspberry Pi server | |
| − | + | [[Cerealbot/avr]] - Setting up the ATmega328 which middleman's between the RPi and sensors | |
| − | + | [[Cerealbot/Financial]] - A list of links to every item I've purchased | |
| − | + | [[Cerealbot/printrbot]] - Doesn't exist yet? | |
| − | + | [[Cerealbot/Queue]] - To be deleted | |
| − | + | [[Cerealbot/Archive]] - Cruft that still may be helpful | |
| − | + | ||
| − | + | ||
| − | + | ||
| − | + | ||
| − | + | ||
| − | |||
| − | + | [https://github.com/ctag/cerealbox Project code on github] | |
| − | + | [http://bns-daedalus.berocs.com:8080/?action=stream Livestream of the prototype] - If this link doesn't open, copy the URL it into the network stream address in VLC. | |
| − | + | [https://www.youtube.com/watch?v=NNv5ZWVwTSQ Video of part ejection] | |
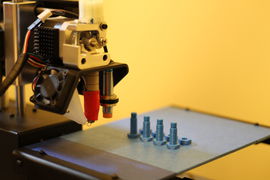
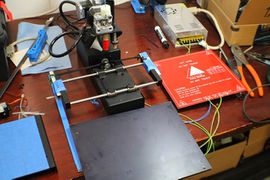
| − | + | == Overview == | |
| − | + | <gallery mode="packed" caption="Cerealbot Development"> | |
| + | File:ctag_printrbot_01.JPG|Unmodified Printer | ||
| + | File:ctag_printrbot_02.JPG|Unmodified Printer | ||
| + | File:ctag_printrbot_03.JPG|Concept Design | ||
| + | File:ctag_printrbot_04.JPG|Prototype Frame | ||
| + | File:ctag_printrbot_05.JPG|Workspace | ||
| + | File:ctag_printrbot_06.JPG|Climate Container | ||
| + | File:ctag_printrbot_07.JPG|Glass Build Plate | ||
| + | </gallery> | ||
| − | + | Regardless of an assortment of companies or model types, low cost FDM 3D printers operate on roughly the same level. Whereas I can incrementally fire off several dozen pages across multiple document types to our shop's laser printer from the comfort of my own home half an hour away, I can pretty much only 3D print while I'm present in the room to scrape each part off the build plate. This project, CerealBot, is my attempt at fixing a few of the issues that keep FDM printers out of practicality for a range of use-cases by making a low cost 3D printer ''serialized''. | |
| − | + | It is my hope that this project will bring about an affordable printer that can be placed in a school and maintained in a low-overhead, ad-hoc manner. The serialization will also allow for maximal student use from each printer, meaning that more investigative minds have access to this technology. | |
| − | + | == Method == | |
| − | + | The current Cerealbot will cycle its hotbed up to ~60C a few times, and the process of heating up and cooling down the part tends to remove its grasp on the build plate. Then the print head can push the part out of the way. BUT: if the part is printed underneath the print head's home location, then the print head will wind up drilling down into the part before trying to sweep it off the plate! To allow for use of the entire print surface, I've added a servo to the hot end which will swing down an arm to push parts off, this alleviates the issue of needing to lower the entire print head and risk crunching the printed part. | |
| − | + | # Cron script checks Octoprint for files that have not yet been attempted | |
| + | ## Script automatically starts the first new file it sees | ||
| + | # Printer prints part normally | ||
| + | ## On completion, a script is called by octoprint | ||
| + | # The hotbed is "cycled" a few times | ||
| + | ## Each cycle entails heating the glass plate and then cooling with the fan on | ||
| + | ## This process shocks the printed object free of the glass | ||
| + | # The servo and print head scan the build plate and push the part away | ||
| − | == | + | == Build a Cerealbot == |
| − | + | If you want to make your own serialized printer, start here. | |
| − | + | === Prerequisites === | |
| − | + | # Borosilicate glass hotbed | |
| + | ## I really recommend getting an inductive Z sensor (8mm) as well, they're cheap and somewhat automate the task of bedleveling! | ||
| + | # Servo mounted on the extruder carriage | ||
| + | ## Mount an arm to the servo that can swing under the hotend | ||
| + | # 12/24V fan aimed at hotbed | ||
| + | ## Fan is wired to a 5V relay which is controlled by the arduino | ||
| + | # Arduino to control fan and servo | ||
| + | # Octoprint server (w/ arduino attached) | ||
| + | ## Optional webcam | ||
| + | ## Cerealbot program/scripts run from this computer | ||
| − | + | === ATmega Firmware === | |
| − | + | If you haven't yet, [https://github.com/ctag/cerealbox clone the git project]. In the project, go to cerealbox/avr/src. Build the .ino source and flash it to the board. | |
| − | + | ||
| − | + | ||
| − | + | ||
| − | + | ||
| − | + | Super simple, right? | |
| − | === | + | === Set up scripts === |
| − | The | + | The the root of the project are a ton of scripts, they must be tweaked before use. I'll be making them more flexible to a variety of printers soon, hang tight. |
| − | + | ||
| − | + | ||
| − | + | ||
| − | + | ||
| − | + | ||
| − | + | ||
| − | + | ||
| − | + | ||
| − | + | ||
| − | + | ||
| − | + | ||
| − | + | ||
| − | + | ||
| − | + | ||
| − | + | ||
| − | + | ||
| + | From the git project, make the file ''../.cerealbox/apis.sh'' | ||
<pre> | <pre> | ||
| − | + | # To be sourced into config | |
| − | + | # Export Octoprint api key | |
| − | + | OCTO_API_KEY="abcde" | |
| + | # Placeholder RedQueen api key | ||
| + | RQ_API_KEY="12345" | ||
</pre> | </pre> | ||
| + | These api keys are private, and not stored on github. [[RQ]] is our hackerspace hivemind, you can leave the api key blank and disable it in the config file. | ||
| − | + | Edit the config file to work with your printer: | |
| + | # pop_part: Script that cycles the hotbed to dislodge the part. | ||
| + | # push_part: Script that uses the servo and print head to sweep the part off the bed. | ||
| − | + | I strongly recommend disabling push_part and tuning the pop_part cycles and temp for a few prints first. | |
| − | === | + | === Set Octoprint Hooks === |
| − | + | This is the dangerous part. I '''HAVE NOT COMPLETED''' this guide, and you have to check that you're ready for these scripts to run rampant whenever a print starts and finishes. | |
| − | + | Edit ~/.octoprint/config.yaml to have: | |
<pre> | <pre> | ||
| − | + | events: | |
| − | + | enabled: true | |
| − | + | subscriptions: | |
| − | + | - command: /home/pi/cerealbox/print_start.sh "{__filename}" | |
| − | + | event: PrintStarted | |
| + | type: system | ||
| + | - command: /home/pi/cerealbox/print_done.sh "{__filename}" "{__currentZ}" > /tmp/lastprint.log | ||
| + | event: PrintDone | ||
| + | type: system | ||
</pre> | </pre> | ||
| − | + | That's it, the scripts should run upon next print. | |
| − | + | == Tasklist == | |
| − | |||
| − | + | * Measure resty vs curl | |
| + | ** Change all api calls to one or the other | ||
| + | * [done] Migrate scripts into folders | ||
| + | * Validate shell scripts | ||
| + | ** Right now I'm scaffolding with .sh files to test the algorithm which clears the print bed, I want a few continuous days of test prints. | ||
| + | * Fix this wiki | ||
| + | ** Clear instructions, separate random notes from instructions. | ||
| + | * Migrate shell scripts to python | ||
| + | * Make project compatible with variety of printers | ||
| − | |||
| − | + | === Script Architecture === | |
| − | + | # Hook Scripts | |
| + | ## on_print_begin.sh "name" | ||
| + | ## on_print_done.sh "name" "z" | ||
| + | ## on_print_fail.sh "name" | ||
| − | + | # Util Scripts | |
| + | ## do_write_msg.sh "type" "msg" | ||
| + | ## get_printer_status.sh | ||
| + | ## send_cmd.sh | ||
| + | ## get_file_status.sh | ||
| + | ## print_file.sh | ||
| + | ## util.sh | ||
| + | ## config | ||
| − | + | # Processes Scripts | |
| − | + | ## do_pop_part.sh | |
| − | + | ## do_push_part.sh | |
| − | + | ## do_proc_q.sh | |
| − | + | ||
| − | + | ||
| − | + | ||
| − | + | ||
| − | + | ||
| − | + | ||
| − | + | ||
| − | + | ||
| − | + | ||
| − | + | ||
| − | + | ||
| − | + | ||
| − | + | ||
| − | + | ||
| − | + | ||
| − | + | ||
| − | + | ||
| − | + | ||
| − | + | ||
| − | + | ||
| − | + | ||
| − | + | ||
| − | + | ||
| − | + | ||
| − | + | ||
| − | + | ||
| − | + | ||
| − | + | ||
| − | + | ||
| − | + | ||
| − | + | ||
| − | + | ||
| − | + | ||
| − | + | ||
| − | + | ||
| − | + | ||
| − | + | ||
| − | + | ||
| − | + | ||
| − | + | ||
| − | + | ||
| − | + | ||
| − | + | ||
| − | + | ||
| − | + | ||
| − | + | ||
| − | + | ||
| − | + | ||
| − | + | ||
| − | + | ||
| − | + | ||
| − | + | ||
| − | + | ||
| − | + | ||
| − | + | ||
| − | + | ||
| − | + | ||
| − | + | ||
| − | + | ||
| − | + | ||
| − | + | ||
| − | + | ||
| − | + | ||
| − | + | ||
| − | + | ||
| − | + | ||
| − | + | ||
| − | + | ||
| − | + | ||
| − | + | ||
| − | + | ||
| − | + | ||
| − | + | ||
| − | + | ||
| − | + | ||
| − | + | ||
| − | + | ||
| − | + | ||
| − | + | ||
| − | + | ||
| − | + | ||
| − | + | ||
| − | + | ||
| − | + | ||
| − | + | ||
| − | + | ||
| − | + | ||
| − | + | ||
| − | + | ||
| − | + | ||
| − | + | ||
| − | + | ||
| − | + | ||
| − | + | ||
| − | + | ||
| − | + | ||
| − | + | ||
| − | + | ||
| − | + | ||
| − | + | ||
| − | + | ||
| − | + | ||
| − | + | ||
| − | + | ||
| − | + | ||
| − | + | ||
| − | + | ||
| − | + | ||
| − | + | ||
| − | + | ||
| − | + | ||
| − | + | ||
| − | + | ||
| − | + | ||
| − | + | ||
| − | + | ||
| − | + | ||
| − | + | ||
| − | + | ||
| − | + | ||
| − | + | ||
| − | + | ||
| − | + | ||
| − | + | ||
| − | + | ||
| − | + | ||
| − | + | ||
| − | + | ||
| − | + | ||
| − | + | ||
| − | + | ||
| − | + | ||
| − | + | ||
| − | + | ||
| − | + | ||
== External Resources == | == External Resources == | ||
| Line 294: | Line 178: | ||
[https://mutelight.org/authbind Quick guide on authbind, which allows octoprint to bind port 80] | [https://mutelight.org/authbind Quick guide on authbind, which allows octoprint to bind port 80] | ||
| − | [[Category:3D | + | [http://hackaday.com/2013/10/23/3d-printering-a-call-for-an-open-source-automated-build-platform/ http://hackaday.com/2013/10/23/3d-printering-a-call-for-an-open-source-automated-build-platform/] |
| + | |||
| + | [http://www.soliforum.com/topic/608/automatic-removal-from-build-platform/ Glass is good for easy part removal] | ||
| + | |||
| + | === Other serial printers === | ||
| + | |||
| + | Someone's building a Cerealbot! [https://wiki.melbournemakerspace.org/projects/CerealBot https://wiki.melbournemakerspace.org/projects/CerealBot] | ||
| + | |||
| + | [http://nvbots.com/about/ http://nvbots.com/about/] | ||
| + | |||
| + | [http://forums.trossenrobotics.com/showthread.php?6311-One-more-robotic-3D-printer-assembler http://forums.trossenrobotics.com/showthread.php?6311-One-more-robotic-3D-printer-assembler] | ||
| + | |||
| + | |||
| + | |||
| + | [[Category:3D printer]] <!--MAKE AS MANY CATEGORIES AS YOU NEED--> | ||
Latest revision as of 12:32, 3 May 2017
|
Creator: |
Contents
[hide]Map
Cerealbot/Hardware - General tomfoolery and notes on random hardware design
Cerealbot/Plastics - Log of what plastic filaments work
Cerealbot/rpi - Setting up the Raspberry Pi server
Cerealbot/avr - Setting up the ATmega328 which middleman's between the RPi and sensors
Cerealbot/Financial - A list of links to every item I've purchased
Cerealbot/printrbot - Doesn't exist yet?
Cerealbot/Queue - To be deleted
Cerealbot/Archive - Cruft that still may be helpful
Livestream of the prototype - If this link doesn't open, copy the URL it into the network stream address in VLC.
Overview
- Cerealbot Development

Unmodified Printer
Unmodified Printer
Concept Design
Prototype Frame
Workspace
Climate Container
Glass Build Plate


Regardless of an assortment of companies or model types, low cost FDM 3D printers operate on roughly the same level. Whereas I can incrementally fire off several dozen pages across multiple document types to our shop's laser printer from the comfort of my own home half an hour away, I can pretty much only 3D print while I'm present in the room to scrape each part off the build plate. This project, CerealBot, is my attempt at fixing a few of the issues that keep FDM printers out of practicality for a range of use-cases by making a low cost 3D printer serialized.
It is my hope that this project will bring about an affordable printer that can be placed in a school and maintained in a low-overhead, ad-hoc manner. The serialization will also allow for maximal student use from each printer, meaning that more investigative minds have access to this technology.
Method
The current Cerealbot will cycle its hotbed up to ~60C a few times, and the process of heating up and cooling down the part tends to remove its grasp on the build plate. Then the print head can push the part out of the way. BUT: if the part is printed underneath the print head's home location, then the print head will wind up drilling down into the part before trying to sweep it off the plate! To allow for use of the entire print surface, I've added a servo to the hot end which will swing down an arm to push parts off, this alleviates the issue of needing to lower the entire print head and risk crunching the printed part.
- Cron script checks Octoprint for files that have not yet been attempted
- Script automatically starts the first new file it sees
- Printer prints part normally
- On completion, a script is called by octoprint
- The hotbed is "cycled" a few times
- Each cycle entails heating the glass plate and then cooling with the fan on
- This process shocks the printed object free of the glass
- The servo and print head scan the build plate and push the part away
Build a Cerealbot
If you want to make your own serialized printer, start here.
Prerequisites
- Borosilicate glass hotbed
- I really recommend getting an inductive Z sensor (8mm) as well, they're cheap and somewhat automate the task of bedleveling!
- Servo mounted on the extruder carriage
- Mount an arm to the servo that can swing under the hotend
- 12/24V fan aimed at hotbed
- Fan is wired to a 5V relay which is controlled by the arduino
- Arduino to control fan and servo
- Octoprint server (w/ arduino attached)
- Optional webcam
- Cerealbot program/scripts run from this computer
ATmega Firmware
If you haven't yet, clone the git project. In the project, go to cerealbox/avr/src. Build the .ino source and flash it to the board.
Super simple, right?
Set up scripts
The the root of the project are a ton of scripts, they must be tweaked before use. I'll be making them more flexible to a variety of printers soon, hang tight.
From the git project, make the file ../.cerealbox/apis.sh
# To be sourced into config
# Export Octoprint api key
OCTO_API_KEY="abcde"
# Placeholder RedQueen api key
RQ_API_KEY="12345"
These api keys are private, and not stored on github. RQ is our hackerspace hivemind, you can leave the api key blank and disable it in the config file.
Edit the config file to work with your printer:
- pop_part: Script that cycles the hotbed to dislodge the part.
- push_part: Script that uses the servo and print head to sweep the part off the bed.
I strongly recommend disabling push_part and tuning the pop_part cycles and temp for a few prints first.
Set Octoprint Hooks
This is the dangerous part. I HAVE NOT COMPLETED this guide, and you have to check that you're ready for these scripts to run rampant whenever a print starts and finishes.
Edit ~/.octoprint/config.yaml to have:
events:
  enabled: true
  subscriptions:
  - command: /home/pi/cerealbox/print_start.sh "{__filename}"
    event: PrintStarted
    type: system
  - command: /home/pi/cerealbox/print_done.sh "{__filename}" "{__currentZ}" > /tmp/lastprint.log
    event: PrintDone
    type: system
That's it, the scripts should run upon next print.
Tasklist
- Measure resty vs curl
- Change all api calls to one or the other
- [done] Migrate scripts into folders
- Validate shell scripts
- Right now I'm scaffolding with .sh files to test the algorithm which clears the print bed, I want a few continuous days of test prints.
- Fix this wiki
- Clear instructions, separate random notes from instructions.
- Migrate shell scripts to python
- Make project compatible with variety of printers
Script Architecture
- Hook Scripts
- on_print_begin.sh "name"
- on_print_done.sh "name" "z"
- on_print_fail.sh "name"
- Util Scripts
- do_write_msg.sh "type" "msg"
- get_printer_status.sh
- send_cmd.sh
- get_file_status.sh
- print_file.sh
- util.sh
- config
- Processes Scripts
- do_pop_part.sh
- do_push_part.sh
- do_proc_q.sh
External Resources
Parts
Amazon is an OK outlet for GT2 gear/belt parts for the X-Y motion
Source for 2-3mm Hex Bolts like those used in the simple metal
MISC
Printrbot initial config guide
Protoparadigm plastic I'm interested in
Quick guide on authbind, which allows octoprint to bind port 80
http://hackaday.com/2013/10/23/3d-printering-a-call-for-an-open-source-automated-build-platform/
Glass is good for easy part removal
Other serial printers
Someone's building a Cerealbot! https://wiki.melbournemakerspace.org/projects/CerealBot
http://forums.trossenrobotics.com/showthread.php?6311-One-more-robotic-3D-printer-assembler